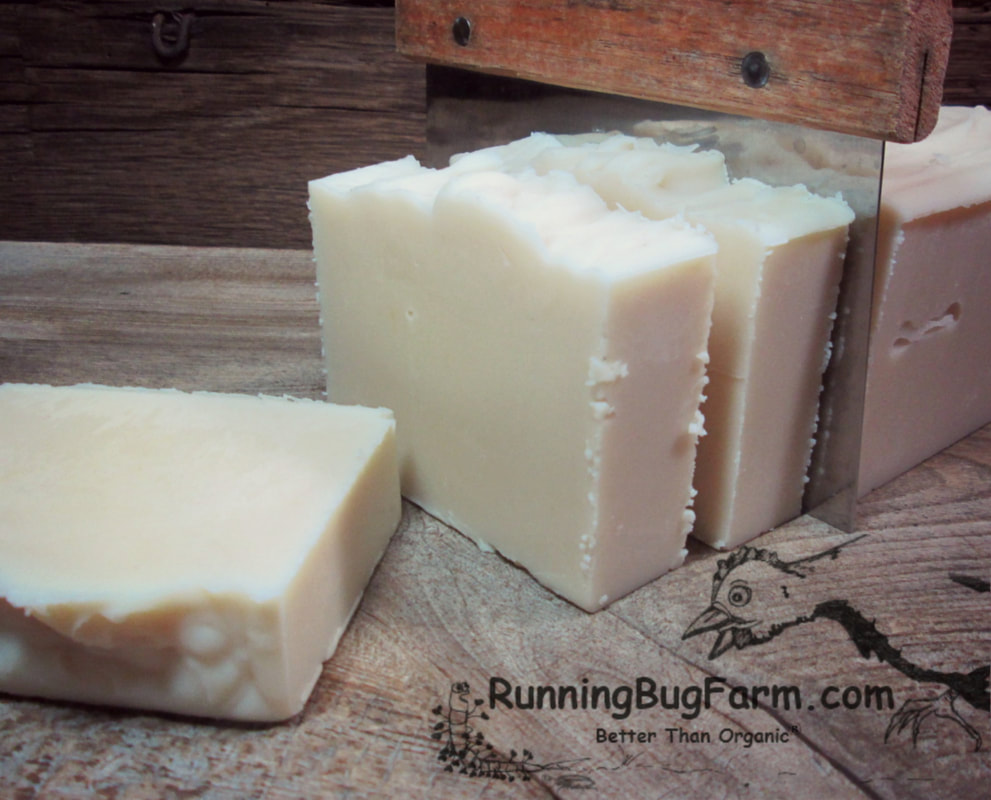
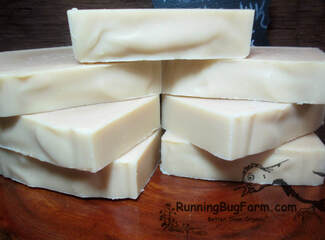
 The directions in this article show you how to make your own milk soap using the cold process method. This is my number one go to recipe. It is simple enough that after a couple of times, you will likely have everything memorized. You will only need four ingredients to make a full batch of soap, but as great as that is, you will need some supplies before you can begin. Even though I am teaching you how to make a basic loaf of milk soap, I still strongly recommend you get a book or two on soap making. I've been making cold process soap for many years now & can always find something new to learn. You will want to invest in supplies that you will use only for soaping. Do not use your regular eating utensils, bowls, etc. for soap making. Please get your basic supplies, before you attempt to make your first batch of soap. Please read through this entire article before you begin. Helpful Tip: At the end of this article I have provided a full slideshow of photos along with guidance to visually assist you with the entire soap making process. The most basic items have been listed. You can always get additional items as your skills develop & you figure out what other items would be useful to you. You may even find that you no longer need some items as you've become very in-tune to the entire process. For example, I no longer need a thermometer. But for a beginner, a thermometer is a must. I have met seasoned soap makers who are so confident in their skills, that they don't even bother to wear goggles. While goggles are uncomfortable, they serve a very important purpose; protecting your eyes from the caustic chemicals & chemical reactions in the soap batter & ingredients. Always wear goggles when making soap. You will also want to wear a comfortable pair of dish gloves. I personally love the Kroger home sense brand of dish gloves. They are purple in color, thick & have a generous amount of inner flocking. If you don't have a Kroger near you, another good option is by Casabella. While goggles are the most important protective wear you can use, gloves are equally important. Always wear gloves when making soap. You will also want a plastic (I know, I know, plastic... but it's really safe for soap making) measuring cup, at least three plastic bowls in various sizes - nesting bowls are very convenient, spatulas, & condiment cups for measuring out essential oils (not for this recipe but useful for other organically scented soaps). I use stainless steel condiment cups. I know I said to use plastic for soap making, but in this situation when only used to hold essential oils, stainless steel cups are perfectly fine. You should also wear long sleeves, an apron, closed shoes (no flip flops or bare feet). Should you get lye on yourself or any working surface, I have found the quickest & most effective option to be good ol' vinegar. I keep a spray bottle handy with about 90% white vinegar, 10% tap water & a drop of natural dish soap. I also keep some rags handy. Whenever I see lye go where I don't want it to, I quickly spray the area & wipe it down, this includes any exposed skin. Lye burns. If you feel a burning sensation, it's probably a lye bead or flake. You need to neutralize it right away. Lye is scary & it is dangerous, but with common sense, it is easy enough to work with. Just don't ever get too comfortable with it; always keep your guard up. You will also want good ventilation. If you can work outdoors on your porch, that's great! An open window works great as well. Your vent on your stove is another option. You can run the vent, open the window & turn on a fan if you like. Soap making is a a stinky chemical process. You are much better off if you can avoid breathing the fumes. A few notes: If your house is cool, you will need to warm your coconut oil so that it is in liquid form. The coconut oil doesn't need to be warm, it just needs to be in a liquid state. There are various ways to freeze your milk. The most common way is to freeze it in ice cube or baby food trays in one ounce portions. Before I got a silicon baby food tray, I measured mine goats milk out by weight on a scale in 9 ounce portions & froze each portion in a zip lock type of plastic lunch bag. When I knew I would be making soap, I pulled out a bag & put it in the sink. The outside of the milk would start to melt a little. By the time I had my supplies ready & my lye measured, I could usually remove the block of milk from the bag. If the bag had creases or folds & is not thawed enough, I would run the bag under warm water & massage the bag until I knew I could get all the milk out of the bag. Supplies: Kitchen Scale & Adapter (adapter is optional) Plastic Measuring Cup With Pour Spout Plastic Nesting Bowls (3 bowls is a great starting point) Immersion Blender Silicon Loaf Pan Soap Cutter Mitre Soap Cutting Box* PH Strips Please read through this entire article before you begin. Plain Milk Soap Ingredients: 21 ounces Organic Olive Oil 9 ounces Organic Coconut Oil 9 ounces Frozen Full Fat Milk (Goat, Cow, Coconut) 4.1 ounces Lye
Further Instructions:
Clean Up: Keep your protective gear on during the cleaning process. You will hand wash everything. If you are using rags, first wipe the soap batter off of your utensils. Once you have them as clean as possible with the rags, place the rags in a dedicated glass jar so that they may cure. Like your soap, the rags will need air to breathe, so do not put a lid on the jar. You can also store the rags in a small cardboard box. Use a very generous amount straight dish soap (no water) applied directly to each item used in the soap making process. Then rinse clean. If anything still seems oily or isn't fully clean, repeat the process until it is fully clean. Dry in your dish rack or on a towel on your counter if you don't have a dish rack. Use the spray bottle of vinegar, water, & soap solution and spray down all surface areas. Wipe clean with a rag. Be sure to get everything. Lye loves to travel especially if the air is dry. When your rags have cured, you can use them for washing. Once you've used up the soap on them, toss them into your washing machine. Line dry. *A note on stainless steel mitre soap cutting boxes I acquired mine many many years ago from a fellow farmers market vendor. It is very similar to the one linked in the supplies. The difference is that mine is longer; fitting the entire loafs length. It also has one cutting slot. Not two. I have tried to find my exact miter box. This is the best I could find. There are several websites other than amazon that sell them. The prices and shipping vary from site to site. Here are a few examples to help you out (I don't have any affiliated aka paid links to these, only to amazon): Mold Market, Bomar, Nature's Garden & Candlescience Step by step slide show photos & basic instructions: You may also like:
0 Comments
|
Affiliate DisclosureAs an Amazon Associate, I earn from qualifying purchases.
This page may contain Amazon affiliate links. If you choose to make a purchase after clicking a Amazon link, I may receive a commission from Amazon at no additional cost to you. As always, Thank you so much for your support. I couldn't do what I do without you! Categories
All
Archives
April 2024
 Hi there! My name is Jen. I'm a "tree hugging dirt worshiper" who has been organically farming for nearly two decades. It never ceases to amaze me at how much I've learned & how much I am still learning. I have studied natural health, nutrition, & herbs for nearly three decades. Our health & the natural world around us are connected in ways we don't often realize. How we treat the land & animals directly affects us in both body & mind. My goal is to provide others with truly natural humane goods from my own little piece of paradise, & to freely pass along whatever knowledge I pick up along the way. I am grateful every day to be able to have such a worthwhile & fulfilling job surrounded by the beauty & unpredictability of Mother Nature. Hi there! My name is Jen. I'm a "tree hugging dirt worshiper" who has been organically farming for nearly two decades. It never ceases to amaze me at how much I've learned & how much I am still learning. I have studied natural health, nutrition, & herbs for nearly three decades. Our health & the natural world around us are connected in ways we don't often realize. How we treat the land & animals directly affects us in both body & mind. My goal is to provide others with truly natural humane goods from my own little piece of paradise, & to freely pass along whatever knowledge I pick up along the way. I am grateful every day to be able to have such a worthwhile & fulfilling job surrounded by the beauty & unpredictability of Mother Nature.

Copyright
You're welcome to link to Running Bug Farm or use a single image with a brief description to link back to any post. Republishing posts in their entirety is prohibited. |
 RSS Feed