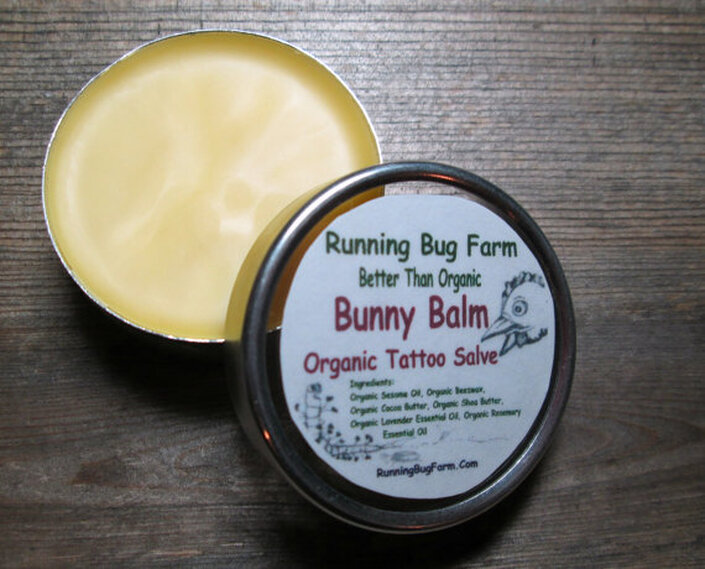
|
I can't think of a better way to both refresh your thirst & nourish your body than with a tall glass of tea made using real organic loose herbs. Not only will this amazing tea blend give your immune system a boost, it also contains heart healthy hibiscus & rose hips which are one of the most abundant natural sources of Vitamin C. Bulk Ingredients 1lb each: Hibiscus Rosehips Lemongrass Elderberries Orange Peel* Cinnamon Stick *For the orange peel I highly recommend making your own. First start with fresh whole organic oranges. Wash the peels & rinse well. Next use a zester to carefully peel the top layer off of the orange. Do not press too hard. You want to avoid as much of the bitter white pith as possible. The goal is to get nice orange strips from the top layer. You can then let them sit in your gas oven with the light on until they dry or put them in a dehydrator on low. Store in tightly sealed glass mason jars until ready to use. If you are ready to make the tea, you can use the fresh peel (no drying) from one orange in your tea ball. Directions:
You can add raw honey, cane sugar, or whole stevia leaf to sweeten to taste or enjoy as is. Enjoy!
0 Comments
Want to avoid all those unnecessary additives and gut harming thickeners in store bought eggnog? Make your own! Not only is my eggnog recipe easy, it's also delicious! You can make it with or without alcohol depending on your preferences.
Homemade Eggnog Recipe: Ingredients (Opt. for organic if possible): 4 C Whole Milk, Coconut Milk, or Oat Milk 8 Egg Yolks, Gelatin, or Agar Agar Flakes 1.5 TBSP Vanilla Extract 1.5 TSP Powdered Cinnamon 1/8 TSP Powdered Cloves 1 TSP Powdered Nutmeg or Mace 1/4 C Sugar Cane, Maple Syrup, or Honey Rum (optional) Old Fashioned Directions Using Any Milk: Put all ingredients into a blender. Blend until thoroughly combined. Pour into a pretty glass pitcher, jar or leave in the blender & chill in the refrigerator. Serve as is or spike with rum. Chill & serve, sprinkled with more freshly grated nutmeg as a garnish. You can even make ice cream. Simply add it to your ice cream maker following your ice cream makers directions. Vegan/AIP Directions: 4 C Coconut Milk (AIP, Vegan), or Oat Milk (Vegan) 1-4 Tbsp (depending on how thick you want it) Gelatin (AIP), or Agar Agar Flakes (Vegan) 1.5 TBSP Vanilla Extract 1.5 TSP Powdered Cinnamon 1/8 TSP Powdered Cloves 1 TSP Powdered Nutmeg or Mace (AIP) 1/4 C Sugar Cane (Vegan), Maple Syrup (Vegan/AIP), or Honey (AIP) Rum (optional - Vegan)
Serve as is or spike with rum. You can even make ice cream & a custard like Eggnog. For ice cream, simply add it to your ice cream maker following your ice cream makers directions. For gelatin Eggnog, use plenty of gelatin or agar agar flakes (whatever amount suits your tastes) & chill in a mold until set. Enjoy! I don't know how the weather has been in your area, but in mine it has been hot! While working outside under the brutal 95 degree sun, dreams of sweet & frosty childhood delights fill my thoughts. "What was that ice cream like stuff Nana used to give me in the summer?" I silently asked while soaked in sweat from working in the garden. It took a bit of time to recall what it was, sorbet! Of course! Once indoors & chugging tea like I have been stranded in the Sahara for days, I went to trusty ol' Google to find recipes for some sorbet. I quickly discovered that sorbet was not what I used to have, rather it was sherbet. Yum! Next up came searching for recipes as well as adding it to that weeks shopping list on the off chance I would find real sherbet sans weird additives & all the other artificial crap that is called food in the grocery store these days.
Once at the grocery store I stocked up on fresh organic oranges, organic carrots & a few organic lemons just in case I couldn't find quality sherbet. No surprise there was no organic sherbet in the natural food section (Side note: Don't you just love how it's the natural food section or the health food section? What exactly does that make the rest of the store? The unnatural food section or the unhealthy food section? How about the death & disease section? Or maybe the pain & suffering section (if you buy factory "farm" meats) whatever it is, I don't want it!) so I wandered over to the the huge frozen section & low & behold there was sherbet. Not a lot of options, but it was something. Time to check the ingredients. Seriously how is this stuff legal? Artificial colors, artificial flavors, binders, emulsifiers & all sorts of garbage I never use or even have in my kitchen. I'd say it's pretty safe to assume that nearly no one has these ingredients at home! Good thing the shopping cart was brimming with fresh organic citrus fruits & veggies. My kitchen appliances would be getting a workout when I got home. Technically you don't need to use the various small appliances in this recipe, but if you do have them, you will have a better finished product if you chose to use them. I modified a food network recipe to suit my tastes. This recipe is fun to play with. You can make popsicles, freeze it in individual servings, let it soften, break it up & toss it into the blender for a slushie. Oh the possibilities! I find it is a fabulous treat to replenish my body after working 12+ hour days during the dog days of summer. No artificially dyed GMO sweetened Gatorade for me, just organic fruits & veggies, fresh Jersey cow milk & sweet sweet sugar. Equipment Needed (optional): Juice Fountain or Juice Extractor or Manual Juicer Food Processor Mixing Bowl Whisk Ice Cream Maker Blender Popsicle Molds Refrigerator Dishes Ingredients: 2 Cups Sugar 1/4 tsp. Salt 2 Cups freshly juiced oranges (approximately 2 - 3 pounds) 1 Tbsp. freshly juiced or squeezed lemon 2 freshly juiced carrots 1 tsp. Vanilla extract or Vanilla powder 1.5 Cups Whole Milk Directions: Peel the citrus fruits & juice along with the carrots in your juicer. If you do not have a juicer you can freshly squeeze the citrus with a manual juicer. You could purchase organic juice at the store but the quality & nutritional content is poor in comparison to fresh. In the bowl of a food processor combine all of the ingredients except the milk & process until the sugar is dissolved. If you do not have a food processor, you can hand whisk the mixture until the sugar is dissolved. Transfer to a mixing bowl & whisk in the milk. Place the bowl in the refrigerator for approximately one hour to get the mixture to 40 degrees or lower. Pour the mixture into an ice cream maker & processes according to your ice cream makers instructions. Transfer the sherbet into a freezer safe container (we use glass refrigerator dishes) for approx. three hours. If you do not have a ice cream maker, pour the mixture into a freezer safe container (we use glass refrigerator dishes) & put into the freezer. Every half hour to hour take out the mixture & hand mix it. Repeat this process until the mixture reaches the consistency of icy sherbet. Options: Pour into popsicle molds & freeze. After freezing, put into a blender & make a slushie. Making your own elderberry syrup is incredibly quick & easy. Not only will you save a lot of money you will also avoid unnecessary additives that are commonly found in store bought brands including organic! Most syrups contain some sort of gum. Gums are known GI irritants & some have even been linked to cancer. My frustration with our food system is what led me on the path I am on now. I have my own native elderberry bushes that are in my mini orchard. It's a battle between me & the birds as to who will get to the ripe berries first. What I do manage to collect, I dry for future elderberry syrup. Making my own organic elderberry syrup is just another part of my homesteading lifestyle. While it is just about impossible to be entirely self sufficient, I do believe it is wise not to be entirely dependent on outside sources.
Elderberry syrup is commonly taken as a natural health tonic. It is an all natural anti-viral. Did you know that the Flu is a viral infection not a bacterial infection? This is why antibiotics are useless in attempting to treat the flu. I wouldn't dream of telling you elderberry syrup is a cure for the flu, but I do recommend giving it a try the next time you feel you are getting sick. You can also take it year round as an immunity booster. Ingredients: Elderberries have antiviral properties. Water Optional Ingredients: Cinnamon has antiseptic & antibacterial properties. Cloves have antimicrobial, antifungal, antiseptic, & antiviral properties. Ginger has anti-inflammatory & blood thinning properties. Honey has antibacterial properties. Sugar Cane has no health benefits. Elderberry Syrup Recipe 1 Cup Fresh or 1/2 Cup Dried Blue or Black Elderberries (Red berries are poisonous) 3 Cups Water 1 Cup Raw Honey, Mollasses, or Sugar Cane (optional) 1 Cinnamon Stick (optional) 3 Whole Cloves (optional) Pinch Powdered Ginger or Thin Slice Fresh Ginger or 1/8 Teaspoon Minced Ginger (optional) Place berries, water & optional spices in a saucepan. Bring to a boil. Reduce heat & simmer for 30 minutes. Smash berries to release remaining juice & then strain the mixture, pressing into the berries to further release the juices. Allow to cool. Stir in optional honey or optional sugar cane until fully dissolved. Store in a glass bottle in the refrigerator. Your homemade elderberry syrup will last approximately 2 - 3 months if stored in the refrigerator. I do not recommend canning your syrup as the high heat will kill off many of it's beneficial properties. Dosage options for children & adults: •1 tsp. every 2 - 3 hours while sick. •4 Tbsp. 3 times a day for 5 days. or •1 tsp. daily for general health. Do not give raw honey to infants. Turmeric is a principle herb in Ayurveda (India's ancient holistic health system). Turmeric is believed to cleanse the blood, maintain healthy skin, assists the nervous system, helps the body absorb vitamins & minerals, purges wastes & builds healthy blood. Turmeric may benefit the circulatory system & a woman's reproductive system. Turmeric is believed to keep eyes healthy, boost the immune system, reduce inflammation, support the liver, balance blood sugar, help maintain normal cholesterol levels & more! There are many ways to incorporate Turmeric into your diet by using the herb to season your food, taking a supplement, adding it to smoothies & one of my favorites, as Turmeric Milk aka Golden Milk. If you decide to add a turmeric supplement to your regimen, I strongly recommend you try to get a brand that is free from additives. I used to recommend Organic India because it is bottled in glass jars, has no fillers, is organic & uses ginger to boost absorption. But they now add pepper per consumer demand. I do not consume pepper because it is an inflammatory. Pepper is not necessary to increase absorption if turmeric is enjoyed with a fat like it is in this recipe. In supplement form, ginger helps increase absorption. Or, simply take the supplement with a fat containing meal. Unfortunately, once folks become fixed on an idea, it is nearly impossible to change their mind. After all, everyone else is doing it. If you wish to avoid pepper, I recommend Nature's Life. It does have fillers, it is not organic, & the bottle is not glass. My options have become severely limited as you can see. The herd mentality says, "Give us pepper!" & manufactures comply. And why wouldn't they? It only makes sense to follow the money. There is no logical reason to make something if no one will buy it. Ready to make some delicious turmeric milk? You can use fresh organic grass fed whole milk, organic coconut milk (best choice), organic oat milk, or your own homemade nut milk or Malk. I don't recommend any store bought milk alternatives due to all of the additives - including the certified organic brands other than Malk & Oatsome. You want to be healthy right? If you don't have all the ingredients on hand, we have provided links to each ingredient so that you may order them without having to search all over the internet. Turmeric Milk 1/4 C Turmeric Root Powder
1 TSP Cinnamon 1 TSP Ginger 1 TSP Ashwagandha Powder (optional, do not use if you have autoimmune disease) 1 C Milk, Coconut Milk, or Homemade Dairy Alternative 1 TBSP Coconut Oil or MCT Oil Honey or Maple Syrup to taste Gently mix the turmeric, cinnamon, ginger & ashwagndha powders together until evenly blended. Add approx. 1 TSP (or more to taste) of the mixed powder to about 1 TBSP of your milk choice to a matcha bowl or drinking mug & whisk together (with a bamboo whisk if using a match bowl or a metal whisk if using a drinking mug) until a smooth runny paste is formed. Add the remaining milk, coconut oil & honey, whisking vigorously or blend in a blender. Note that without continuous stirring the powders will settle to the bottom of your mug. You can drink the dredges or try reusing them for a second cuppa. Serve hot: Heat the mixture over the stove. Serve cold: Add to a blender with some ice. You can also use the powder in smoothies, add it to coffee or cocoa, whatever appeals to your personal taste. Enjoy! Old Fashioned Cranberry Sauce Before we moved to West Virginia, we used to crawl around on our hands & knees hand gathering cranberries & filling bag after bag with their delightfully bright, light oblong bodies. Now that we are no longer near any cranberry bogs, we are thankful that we can find fresh raw organic cranberries at the grocery store. I have made many delicious dishes utilizing all the berries we gathered over the years. The final year we gathered berries, we knew it was the last as we had just purchased our first (& hopefully our last) home - this one! We filled jar after canning jar with berries & packed the freezer full! Once we settled in, I made the most important recipe of all, my old fashioned cranberry sauce. Now we have row after row of quilted jelly jars on the shelf to show for our efforts. Each one is a tiny part of our past waiting to be enjoyed in the future. This Thanksgiving as I pulled out a slightly dusty garnet red jar, my thoughts drifted to my Nana as they do every season. Nana was never easy to please. She complained much more than she praised. Compliments were like glittering jewels on the hilt of a very sharp tongue. On the Thanksgiving she first tried my home made cranberry sauce the praise seemed to never end. Not only did Nana compliment the sauce, she exclaimed over it in utter delight! I was amazed. I was thrilled. I pinched myself for surely this is a dream. Nana is never happy. Perhaps we should slap each other silly? But no, Nana was sincere. It wasn't a dream. I made Nana happy. Finally having done something that met with her approval, I diligently prepared this cranberry sauce for every Thanksgiving & Christmas dinner no matter what. Every October I made sure to never be without fresh cranberries. You would find us crawling around the cranberry bogs collecting our bags of berries, clothes stained with from crushed berries & tired smiles on our sunburned faces (I've since learned to wear a sun hat). We would dump the berries out in the sink when we got home to sort out the bad berries, pick off the little stems & rinse away the dirt. Next we put them into canning jars raw, filling at least one shelf in the freezer with Mother Natures M&M's. The reward for our hard work was in seeing Nana's face alight with pleasure and I have to admit, I happen to like my cranberry sauce too! It has been many years since Nana has passed from our lives, but my home made cranberry sauce lives on (albeit without the bog crawling). It is strange how that which seems so insignificant to one holds profound weight to another. When I see my jars of sauce on the shelf, I keep her alive in my heart & memories with every deep red spoonful. Ingredients: 12 Ounces of Fresh or Frozen Cranberries 1 Cup of Water 1 Cup of Sugar Cane, Maple Sugar, Maple Syrup, or Honey 1/2 tsp. of Orange Zest Directions: Rinse the cranberries in cool water, discarding any stems or blemished berries. In a 3 quart saucepan bring the water & sugar to a boil. Stir until the sugar dissolves. Add the cranberries & simmer, stirring occasionally, until the cranberries pop (this can get a bit messy), about 10 minutes. Stir in the orange zest. Cover & refrigerate until chilled. Serve. Notes:
If you enjoy organic oranges, you can make your own orange zest using a zester. I zest all of my citrus fruit for this purpose. I put the fresh zest into individual glass dessert dishes & let them sit on top of our toaster oven. We don't own a microwave. We reheat our home cooked meals using either the toaster oven or the stove top. This means the toaster oven gets a good amount of use. The heat from the toaster dries out the zest without damaging it. When the dessert bowls are full, I put the dried zest into a coffee grinder & pulse to the consistancy that I like. I then store the zest in pint amber glass canning jars. You can also use a dehydrator to dry your zest. If you would like to put up your sauce, be sure to use sugar cane for your sweetener. I process mine using 6 ounce jelly jars in a hot water bath just like I would for jams. Check your Ball Blue Book for recommended times based on your elevation. My cranberry sauce is naturally acidic & sugary which helps prevent undesirable bacteria. I know the recommend shelf life for canned goods is one year. I am happy to report, that my canned cranberry sauce lasted more than 6 years. I made a big batch & I am the only one who eats it, so yep, it lasted a long while! I am not recommending you let yours sit beyond one year. Please follow the safety guidelines provided in the most current Ball Blue Book you can get your hands on. If you can't use sugar cane, you can always freeze your sauce. When I have sauce that doesn't seal & I know I wont eat it soon, I label it & date it & pop it in the freezer. You can do the same thing with your honey or maple sweetened cranberry sauce. If you wish to can it, Putting It Up With Honey is a great canning book. I currently do not have any recommendations for maple at this time. These instructions are for making a 1 quart mason/canning jar of Kombucha Making Kombucha at home is much more economical, environmentally friendly & healthier then buying bottles of Kombucha at the store. Once you get started, you can keep going from that one original starter and even get "babies" (more SCOBY)! If you ordered your organic SCOBY from me, you will want to refrigerate it right away & begin to culture it in no less than two days. It is hungry & miserable after it's trip from me to you & needs TLC. Remember, it is alive! Always start with clean utensils, jars & pots. Cleanliness is critical. You do not want anything else growing in your tea! It can get bugs, larvae & mold if you are not careful in every step of the process! Chlorinated water can kill the Kombucha microorganisms. Distilled, well, or good bottled water works best. Never use any metal except stainless steel. Glass is an excellent choice. Do not use ceramic! Organic black or green tea is the best choice. Do not use tea with flavorings or oils (an example of a flavored or oil added tea is Earl Grey). Use only 100% tea. No additives. Organic sugar cane is a much wiser choice than non organic. Genetically engineered beets are now allowed & in use on the market. You won't know they're GMO beets because the ingredients will simply say "sugar." Do not use artificial sweeteners of any kind. Do not use agave, honey, or maple syrup. Sugar cane is the only acceptable source of food for the culture. Heat approx. 3 Cups of water until boiling for black tea. If using green tea, heat the water until it just starts to boil. Water that is too hot creates a burnt taste & damages delicate green tea leaves. Turn off heat & add 3 tsp. of organic plain loose leaf black or green tea. Or 3 tea bags of the plain organic black or green tea of your choice. Add more or less tea depending on how strong you like your tea. If you choose tea bags, make sure they are not made from plastic. Plastic tea a bags often have catchy names such as "pyramid" or "silken". Don't be fooled. Look for natural, untreated paper tea bags. Steeping for 3 - 4 min. is the average time for black tea. Or 2 - 3 min. for green tea. Make sure you cover the pot while your tea is brewing. You don't want anything getting in your brewing tea that shouldn't be there! After you remove the tea, let the freshly brewed tea cool (covered) to room temperature. Get a large stainless steel tea ball here. Note: If you want your tea very strong tasting, you can allow the tea to brew until you are ready to add the sugar. It's your Kombucha, make it how you like it. 😋 Once the tea has cooled, add approx. 1/4 C of organic sugar cane. Make sure the sugar dissolves completely. I like to do this step when the tea is luke warm, making it easier to dissolve the sugar. Once the sugar is dissolved & the brewed tea is at room temperature, add the brewed tea to your mason jar. Next you add the SCOBY & the liquid (K-tea) it is floating in. You now need to cover the jar but it has to be able to breath. You can use a unbleached paper coffee filter OR A fabric jar cover. A fabric jar cover can be purchased custom made for covering Kombucha vessels. Or you can use an old clean cut cloth aka rag (think Zero Waste), a hankie, or make your own. Any natural reusable cloth cover is the most eco friendly option. Should it become soiled, just toss it in the wash. The cloth or coffee filter needs to be secured to the top of the jar so that bugs cannot get in. A tight rubber band or a canning jar band are both great options. Find a nice dark place that is at room temperature. Store the Kombucha brew undisturbed for 5 - 7 days. The longer you let it sit the more vinegary it gets as the culture eats the sugar. The cooler the temps are inside, the longer it will take to ferment. In warmer temps, it can ferment very quickly. If your temps are rather low, you can place a fermentation mat or wrap under the jar/s or even let the jar/s sit on top of your refrigerator or freezer. In the winter I like to keep mine on top of my freezer as the top gets pretty warm. In the summer I either slow down how many vessels I have fermenting or I move them to a cooler area of my cabin that is not my kitchen. Note: a mat is not required to successfully ferment your kombucha. In cooler temps. it will simply take longer. How long, depends on the temp of your home & how sweet you want your finished product to be. If you don't like to wait or want a stronger more vinegary brew, you might want to invest in a heat mat/pad. By the 5th, 6th, or 7th day you can start the process all over again by using either the newly formed SCOBY, the mother SCOBY or both plus approx. 1/4 C of your Kombucha tea (KT). Place the finished KT in your refrigerator to slow fermentation. It should be slightly effervescent & vinegary. I like to drink mine right away with a little freshly squeezed organic lemon or organic lime. I also enjoy adding a bit of organic ginger root & organic lemon. For a healthy urinary tract, I'll add a splash of organic unsweetened cranberry juice not from concentrate. Remember, you can make KT over & over again from your first starter! Soon you'll have enough to share! If you find yourself overrun with SCOBY, you can toss them into your compost pile (you do have a compost pile don't you?) or feed them to your chickens if applicable. 🐔🐔🐔 Commonly Asked Questions"I see black stuff. I know it's mold. I want a refund." - Black stuff is not mold. What you are seeing are spent yeast strands. This is perfectly normal. THIS IS MOLD THIS IS NOT MOLD THIS IS MOLD THIS IS NOT MOLD As previously mentioned, the darker sections are spent yeast strands. This is normal & healthy. It is NOT mold. "My order will sit over the weekend at the post office. It is very hot out will it be okay?" - Yes as long as you follow our instructions everything will be fine. Remember the post office is temperature controlled, it will not be the same temperature as outdoors. "My order will sit over the weekend at the post office. It is very cold out. Will it be okay?" - Yes as long as you follow our instructions everything will be fine. Remember the post office is temperature controlled, it will not be the same temperature as outdoors. "I am going on vacation is it okay if my order sits in my mailbox until I get home?" - NO! Do not order any culture if you will not be able to receive it the day it is delivered. "My SCOBY is on the bottom of the jar. Is it okay?" - Yes. Sometimes a SCOBY will rest at the bottom of the jar. Many times it will rise to the top. "My SCOBY is not floating at the top of the liquid, it is sideways. Is it okay?" -Yes. Sometimes a SCOBY will not sit at the top of the liquid. If it stays sideways a new SCOBY will likely form above it as it ferments. My instructions let you make your own Ghee at home quickly & easily. Ghee, also known as clarified butter is a dairy free alternative to butter originating from India and Pakistan. The dairy proteins (casein and whey) & nearly all of the milk sugars (lactose & galactose) that some people cannot digest are removed in Ghee. Even though ghee can contain trace amounts of milk sugars, most people who are lactose & galactose intolerant can enjoy ghee. This is different from a milk allergy. With an allergy the immune system reacts to a specific protein, causing an allergic reaction. If you have a milk allergy, you should not have ghee because it contains milk. Rather than consuming ghee, why not try organic butter flavored coconut oil? I use it reguarly & I love it. Purchasing organic grass fed ghee can get pretty expensive. Fortunately it is not hard to make. For the best Ghee you want to start with the best high quality organic local grass fed butter you can get. The next best choice is organic butter from the store. The better the quality of your butter, the better the quality of your Ghee, the better the quality of your health. Equipment needed: Kitchen Scale Crock-pot Fine Metal Strainer Cheesecloth Glass or Stainless Steel Bowl Canning Jars Let's Get Started!Weigh the organic butter. Two to three pounds is a good amount to work with. This will give you between one and two quarts of ghee. On average I get about one full quart & usually a little more than half of another quart. I like to work in larger batches so I don't have to make it as often. Feel free to use less butter if you don't consume much ghee or would prefer to make it more often rather than store it. This is approx. 2 - 3 lbs of fresh organic homemade grass fed butter. I have a glass dinner plate resting on top of the fixed glass plate on the Taylor scale. Don't forget to clear the weight before adding the butter. Your scale should be at 00. Place the two to three pounds of butter directly into your crock pot. I recommend using unsalted butter & adding salt to a finished dish to taste (you can use salted butter if you prefer). Turn your crock pot to "Low" allowing the butter to melt & simmer. If it doesn't simmer turn it to "High" (Crock-Pot heat varies by manufacture & size). Let the butter simmer. The butter will have a nice head of foam as it simmers. This could take up to four hours depending on your Crock-Pot. The butter liquid will start to turn a rich golden color. When you move the foam from the top, it will look clear with sediment at the bottom. Here you can see it is very clear with spent foam at the top & crust at the bottom. When you move the foam layer aside, you can see to the bottom of the Crock-Pot. You're Ghee is done cooking at this point. Turn off the heat & let cool for approximatley one hour so that you can safely handle it without getting burned. Do not let it cool completely. You still need it to be in a liquid state so that you can strain it. You can use a metal strainer alone as pictured or several layers of cheesecloth in the strainer (this depends on how clean/clear you want your finished ghee to be. The latter is the best method). Carefully pour the cooled but still warm (not hot!) liquid ghee into the strainer & into a stainless steel or glass bowl leaving the coagulated dairy proteins behind. In this picture I poured directly into quart mason jars. This is slightly burned coagulated dairy protein stuck to the bottom of the crock pot. It looks awful, but is surprisingly easy to clean up. A spoonful of slightly burnt coagulated dairy. This is what remains of the parts of butter that you can't digest if you have dairy issues. With it removed you can finally enjoy butter via Ghee! Transfer the strained Ghee into glass mason jars & let cool. You can strain again if desired. When cool & ready to enjoy it should look like the photo at the very top of this page. In this photo, I show a batch of my homemade ghee on each side of an excellent store bought organic cultured ghee. As you can see, mine is slightly darker for this batch. Typically it is nearly identical. My goal for each batch is to have it as close as I can get to the quality of Purity Farms organic cultured ghee. If you decide DIY ghee isn't for you, I highly recommend the ghee in the link in the above paragraph. My Ghee is on the left (it's the slightly darker ghee). Purity Farms cultured Ghee is on the right. Good stuff! Home Made Grass Fed Organic Butter VS. Organic Store Bought Butter Organic butter from pastured grass fed cows contains more nutrition & vitamins than non pasture raised. Grass fed butter is loaded with fat soluble nutrients as well as vitamins A, K2 & E. It even contains CLA which is a heart healthy fat. Only 100% grass fed butter contains CLA. The light colored stick is certified organic store bought butter. Note the lack of color. The lighter color indicates a lack of natural grasses & grazing in the diet. The lumpy, wrinkly, dark yellow rounds are homemade 100% grass fed butter. Always choose organic grass fed if you can afford it. It is so much better for you & your family. For food safetly, it is best to store homemade ghee in the refrigerator. It will keep for up to a year. For longer storage, you can even freeze it. If made properly, it will last several months at room temperature. Keep in mind that it will be much softer at room temperature & can even begin to melt when it's hot out. Do not attempt to store Ghee in a butter crock.
Homemade ghee isn't the same as store bought. It is important to understand that it can develop mold & there is always a risk of botulisim if you didn't get all of the water out during processing. This is why it is much safer to keep it refrigerated. Enjoy! Believe it or not making your own mayonnaise is quick & easy! I strongly recommend using a good quality food processor. If you do not have a food processor you can use a good quality blender. Did you know that there is a hole in the food processor for making mayonnaise? In order to make great tasting mayonnaise, you need to use the best organic ingredients! In my recipe I use real olive oil. If you are lucky enough to find the olive oil I linked to in stock, don't miss out (& while you're at it, would you let me know too?). It is the best olive oil I have ever had. Unfortunately the majority of olive oil sold in the United States is not real olive oil! It is usually a combination of oils with a tiny amount of olive oil added in. How this is legal is beyond me. Real olive oil has a distinct bite & aroma. Once you experience real olive oil you will never buy counterfeit olive oil again! Mayonnaise also requires the use of raw eggs. Don't panic! Raw eggs are not as bad as the media would have you think. For those of you born in the 1970's or earlier, do you remember eating raw cookie dough or cake batter? Did you ever get sick? Yea, we didn't get sick either. The problem with today's eggs is not the fault of the eggs but the fault of how they are produced. Hens are overcrowded, the eggs they lay fall onto layers of poultry litter (a nice way of saying chicken poop) where they are stepped on by chickens whose feet have poop on them. Many chickens die & the eggs are in contact with the trampled carcasses as well. This is the scenario for "cage free" eggs. Chickens in battery cages suffer much worse but the eggs are probably a tiny bit cleaner due to the fact that they roll across a wire floor where the collect in a tray on the outside of the cage. Still, chicken factories are filthy, ammonia reeking, feces laden, places of suffering for our feathered friends. So what is a person to do? Simple! Buy fresh organic eggs from your local farmer! Get to know the small farmer & find out directly from the horses... farmers mouth, how they raise & collect the eggs. Salmonella rarely ever occurs in farm fresh eggs. In factory farming you can guarantee your eggs will make you sick if you do not cook them. Homemade Mayonnaise INGREDIENTS: 2 Organic Egg Yolks 2 Tablespoon Organic Apple Cider Vinegar 1 Teaspoon Organic Sugar Cane (optional) 1 Teaspoon Organic Dry Mustard (optional) 3/4 Teaspoon Sea Salt Dash of Organic White or Black Pepper (optional) 3/4 Cup Organic Real Olive Oil 1/4 Cup liquid (room temp) Organic Coconut Oil Directions For Using A Food Processor: Put all ingredients except olive & coconut oils into your food processor & combine by pulsing. At high speed add the olive oil to the dispenser in your food processor. Add the coconut oil as soon as it can be added to the dispenser. Continue blending until the mixture is thick & smooth. Store in a glass jar in the refrigerator for up to two weeks. You should be able to tell right away if your DIY Mayo has spoiled. Directions For Using A Blender: Put all ingredients except olive & coconut oils into your blender.Combine ingredients at medium speed. At high speed, add 1/4 cup of oil 1/2 teaspoon at a time; then, still beating, very slowly pour 3/4 cup oil in a thin, steady stream into mixture; continue beating until thick & smooth. Store in a glass jar in the refrigerator for up to two weeks. You should be able to tell right away if your DIY Mayo has spoiled. Feel free to make changes to my recipe! If you would like a thicker mayo, add more coconut oil. If you want it thinner, remove the coconut oil entirely & replace it with olive oil. After a lot of messing around, I have found the perfect combination to be about 75% olive oil & 25% coconut oil.
You can even change the spices to suit your needs & tastes. For example, I discovered I am very sensitive to nightshades. For this reason I now omit the pepper, mustard, & sugar. The mustard omission is because it's a seed. The sugar omission is because it's inflammatory. If you follow a Keto or Paleo diet, the sugar omission makes it compliant. If you follow an AIP diet, this mayo is not suitable due to the egg yolks. But if you find you are not sensitive to egg yolks, then by all means, enjoy! For AIP, avocado is often used. Note, if you are also sensitive to FODMAPs, you may find a AIP avocado mayo to cause digestive distress. |
Affiliate DisclosureThis page may contain affiliate links. If you choose to make a purchase after clicking an affiliated link, I may receive a commission at no additional cost to you.
As always, thank you so much for your support. I couldn't do what I do without you! Categories
All
Archives
February 2025
Hi there! My name is Jen. I'm a "tree hugging dirt worshiper" who has been organically farming for nearly two decades. It never ceases to amaze me at how much I've learned & how much I am still learning. I have studied natural health, nutrition, & herbs for nearly three decades. Our health & the natural world around us are connected in ways we don't often realize. How we treat the land & animals directly affects us in both body & mind. My goal is to provide others with truly natural humane goods from my own little piece of paradise, & to freely pass along whatever knowledge I pick up along the way. I am grateful every day to be able to have such a worthwhile & fulfilling job surrounded by the beauty & unpredictability of Mother Nature.
Copyright
You're welcome to link to Running Bug Farm or use a single image with a brief description to link back to any post. Republishing posts in their entirety is prohibited. |
RSS Feed
