RUNNING BUG FARM
  • Shop
  • Reviews
  • Blog
  • About
  • Resources & Support
  • Angora Rabbit Colors

Starting Blue Podded Shelling Peas From Seed

5/21/2016

 
DIY at Home! Starting Blue Podded Shelling Peas From Seed
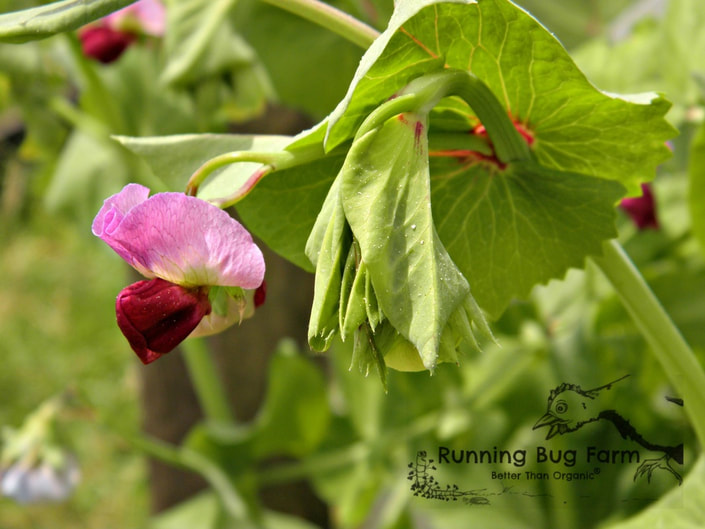
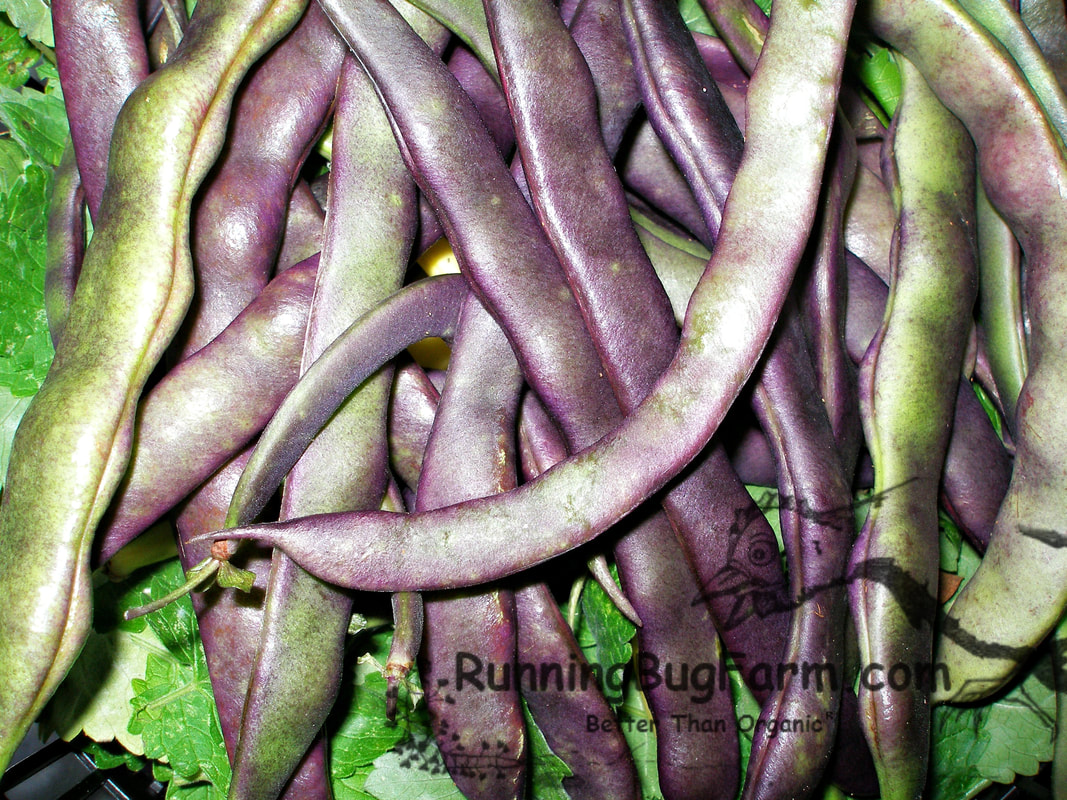
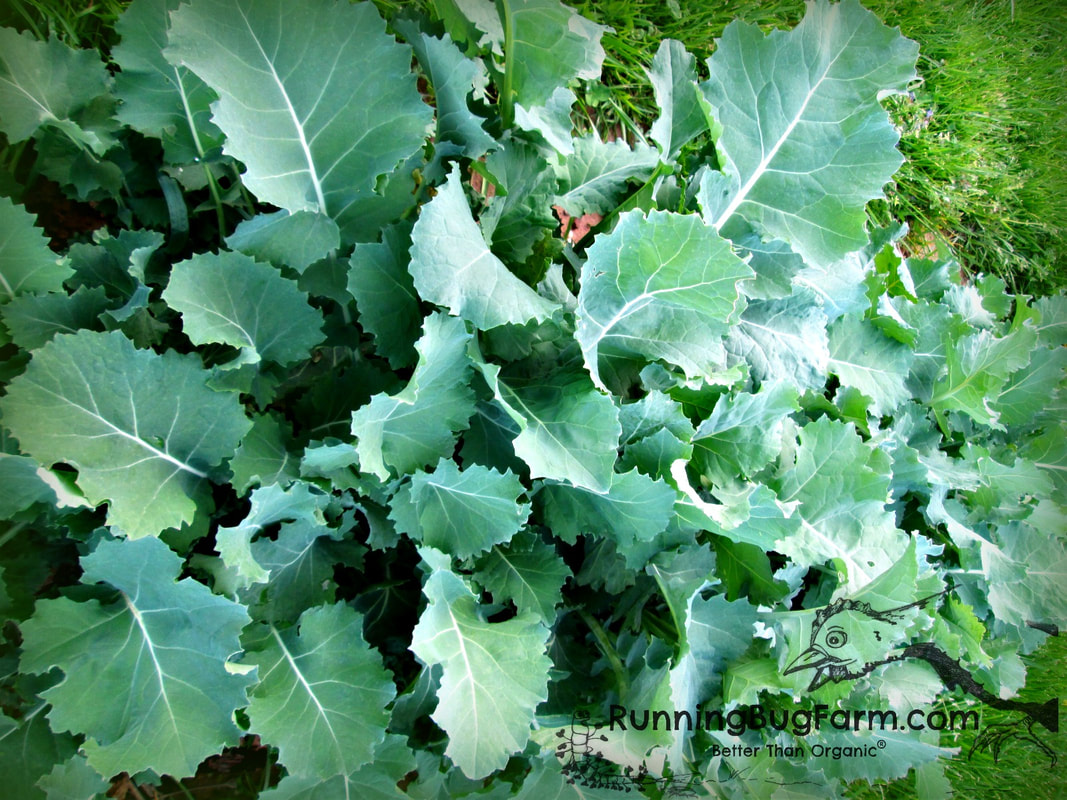
Flowering
The Blue Podded Pea colorfully produces lovely purple-blue pods that can be harvested young & used as a snow-pea, or let mature & shell for soup peas (dry soak overnight for dried peas).  The flowers are a beautiful purple/red & the pods are a deep purple/blue. The Blue Podded Pea is productive Dutch strain of heirloom pea that dates back hundreds of years & remains popular to this day.

Peas do well when it's cool (think spring & fall).  For the highest yields make sure they have a trellis to climb.  This ensures more of the plant gets sun.  Continually harvest ripe pods to increase the harvest time.  If saving for seed &/or soup, leave the pods on the vines until they dry & the seeds (peas) become hard.

Temperature for Germination: 45 - 75F
Direct Sow: As soon as the soil can be worked (approx. 2 weeks before the last expected frost date).
Size: 24" - 36"
Hardiness: Hardy Annual
Hardiness Zone:  2 - 11
Sun: Full
Water: Moderate
Seed Spacing: 2”
Seed Planting Depth: 1"
Row Spacing: 6"
Plant Spacing: 6"
Days to Germination: 7 - 14
Mature: 80 - 85 days
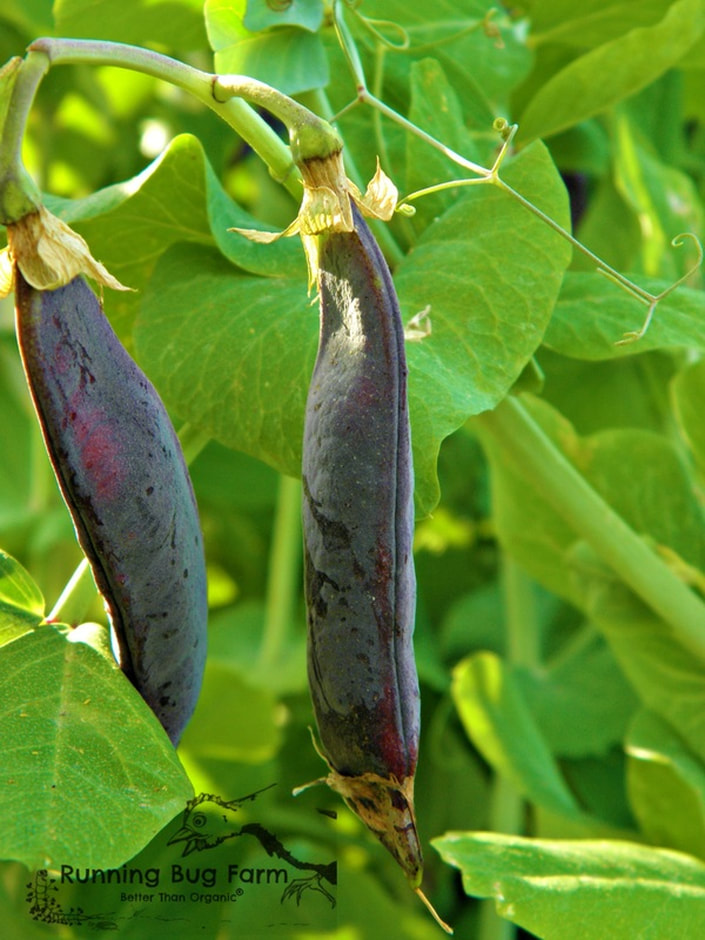
How to grow Blue Podded Shelling peas from seed.
Just about harvest time!

Starting Lemon Balm From Seed

5/1/2016

 
Starting Lemon Balm From Seed DIY Home Grown Guide
Lemon Balm
Lemon Balm (Melissa officinalis) is a calming herb in the mint family with a delicate lemon flavor. It is both a culinary & medicinal herb. It is often used for sleeping problems, menstrual cramps, gastrointestinal problems such as gas & nausea, urinary spasms & nervous agitation. It can also be added to skin treatments for problems such as cold sores.

The chopped fresh leaves of lemon balm can be tossed into a salad or added to a dish to add a lemony zest to sweet dishes such as fruit salads, drinks, custards & sorbets. It also pairs well with tangy dishes adding a lemony zest. Like most herbs, it can be used to make herb butter & added to sauces & marinades. It makes for a great addition to poultry stuffing, lamb, pork & fish. It combines well with allspice, bay leaves, mint, pepper, rosemary, thyme, chervil, pepper & parsley.  Be sure to add your lemon balm (or any other fresh herbs with essential oils) to the end of cooking. High heat can damaged the essential oils & reduce the flavor.

Lemon balm is a pick & come again herb which produces well when heavily picked. Harvest in mid to late afternoon when the oils are strongest & they are at their most aromatic. Leaves should be handled delicately as they tend to bruise & turn black.  Lemon balm grows best in well drained rich soil & is sensitive to frost. If you let your lemon balm go to seed, it will easily self sow or you can save the seed to plant in a new location. It does not produce runners like mint, but will easily spread as seeds mature.  Keeping the plant trimmed will reduce dropped seeds & keep the plant healthy & bushy.

To dry, cut at the base, lightly tie together & hang to dry in a cool dry location free from sun & bugs or put into your food dehydrator & follow the directions for your machine. Once dry store in glass jars. You can crush it by hand or add it a food processor (best to remove the stems first). Seeds should be harvested after they begin to turn brown. Cut stem & place in a paper bag to collect the seeds.

Temperature for Germination: 20°C (68°F).
Direct Sow: After all danger of frost, or start indoors 6 - 8 weeks before last frost.
Size: 24" - 36"
Hardiness: Hardy from zone 5 and above.
Sun: Full - Part Shade
Water: Moderate
Seed Spacing: 3 to 4 seeds per 12”
Seed Planting Depth: Lightly cover seed (Approx. 1/8").
Row Spacing: 12"
Days to Germination: 10 - 14
Thin: To one plant when plants have 4 leaves.
How to Grow Your Own Lemon Balm From Seed

You may also like:

Starting Thai Red Roselle Hibiscus From Seed

5/1/2016

 
DIY Hibiscus Growing Guide.
Here you can see both the flowers & calyxes on our live plants.
Hibiscus is both a culinary & medicinal herb.  It is commonly used to for high blood pressure, liver health & hangovers to name just a few. The bright red calyxes of the hibiscus plant can be used to make "red zinger" tea (tea needs to be boiled to get the deep red color & flavor. Simmer for 10-20 min. or longer.), sauce, syrup & jam (you don’t need to add pectin because hibiscus leaves contain 3 percent pectin.), or candied whole. The leaves can be used fresh in salads. Cut open calyxes & remove the white seed capsule at the base, then rinse prior to use.

To grow hibiscus from seed you must first nick or sand the seeds to get moisture into the seeds in order to improve the germination rate.

In temperate zones, start hibiscus in pots at the same time as you would tomatoes. When seedlings are 3" - 4" high, transplant them to a sunny spot in the garden. Hibiscus grows well in soil with a high level of organic matter, but too much nitrogen will delay flowering. Keep plants evenly moist & well-weeded until they are 1 1/2' - 2' high. Once this height is reached, mulch the plants to keep weeds at bay for the rest of the season.

Pick young calyxes by hand when still tender or use garden clippers once stems have gotten tough. Pick approx. 10 days after flowers open at the beginning or the end of the day. Harvesting the calyxes early promotes greater yields. Around 6 weeks, the young edible leaves & shoots can be picked.

Fresh calyxes are typically dried or dehydrated prior to storage. You can keep them fresh in the refrigerator for 4 – 7 days. Leaves & stem tips can be stored in the refrigerator for about a week.

Cut the base of the calyx with a knife & pop out the seed ball. Note: calyxes may have tiny fine spines that can get stuck in your fingers. Place the leafy red part in your dehydrator & dry per your dehydrators instructions. You can discard or safe the seed pods.  If saving, it is best to dry them separately from the red calyx petals. Dry the seeds per your dehydrators instructions. Once dry, the pods will crack open. You can then shake & dump out the seeds into a light proof saleable container. Keep in a cool dry environment until ready to plant.

Temperature for Germination: 75 - 85°F
Sow Indoors: 4–8 weeks before average last frost.
Direct Sow: After average last frost.
Size: 36" - 60"
Hardiness: Frost-tender perennial
Sun: Full (needs 13 hours of light to bloom)
Water: Low - Moderate
Plant Spacing: 3'
Seed Planting Depth: 1/4" - 1/2"
Row Spacing: 5'
Days to Germination: 7 - 14 days
Maturity: 90 - 100 days
Harvest:  90 - 150 days

Learn how to grow your own hibiscus from seed.
Freshly harvested calyxes.

Starting Sea Island Brown Cotton From Seed

5/1/2016

 
Growing Guide for heirloom Sea Island Brown cotton using better than organic (chemical free) methods.
Sea Island Brown cotton has "naked" seeds that are a pleasure to hand gin
Grow your own rare naturally colored chemical free cotton for spinning, textiles & more! If you spin, you will welcome having your very own chemical free cotton. Everyone should try growing cotton at least once, it is a memorable experience rich in American history. Our rare heirloom cottons have fallen out of production for the conventional white cotton grown today. Unless organic, this conventional cotton is heavily sprayed & one of the top GM crops grown along with crops such as corn & soy.

Cotton is an annual plant that requires a long, warm growing season to mature properly. Needs full sun. In zones 8–10 it can be sown directly after the last frost. In zones 5–7, treat like tomatoes, start seed indoors and transplant out 4–8 week-old seedlings after last frost. Seed germinates in 7–21 days at 70°F. Plant 18–30 in. apart in rows 5 ft. apart. Plants start flowering in mid-summer. Bolls take a few more months to mature; warm late summer weather is necessary for a good crop. Plants grow to 5–6 ft. tall.

135 days. Seeds are easier to remove from the lint than other cottons. Staple length is longer than other heirloom brown cottons. Spun cotton has some shine.

Direct Sowing: Sow seed in a light, well drained, slightly acid to neutral soil. Supply soil generously with compost or other organic matter, especially in clay. Sow no deeper than 2 - 4 times the seed diameter. Do not sow in waterlogged soil or heavy clay.

Transplanting: Use a good quality sterile seed starting mix. Sow pots or flats 4 - 8 weeks before transplanting. When several leaves have developed, harden off the seedlings by placing them outdoors in direct sunlight for no more than an hour. Gradually increase the outdoor exposure over a period of several days. Transplant to the garden after the last frost.

Harvest: Wait for bolls to split open before harvesting.

Seed Savers: Isolate varieties by 1/8 mile for home use, or 1/4 to 1/2 mile or greater for pure seed.
Grow your own clean plant based cotton fibers to harvest and spin. Save the lint free seeds for planting the following season. Sea Island brown cotton is an heirloom cotton that has fibers that are naturally brown in color.
Sea Island Brown Cotton Boll Ready To Harvest
"Conventional cotton is considered the world's 'dirtiest' crop due to its heavy use of insecticides, the most hazardous pesticide to human and animal health. Conventional cotton covers 2.5% of the world's cultivated land yet uses 16% of the world's insecticides, more than any other single major crop.

Aldicarb, parathion, and methamidopho, three of the most acutely hazardous insecticides to human health as determined by the World Health Organization, rank in the top ten most commonly used in cotton production.

All but one of the remaining seven most commonly used are classified as moderately to highly hazardous.

Aldicarb, conventional cotton's second best selling insecticide and most acutely poisonous to humans, can kill a man with just one drop absorbed through the skin, yet it is still used in 25 countries and the US, where 16 states have reported it in their groundwater."  - Organic Trade Association
Grown your own heirloom Sea Island Brown cotton without chemicals. Organic growing guide from Running Bug Farm Better Than Organic.
Small crop of young Sea Island Brown cotton plants with Spearmint plants tucked in the rows to help deter insects

    Affiliate Disclosure

    This page may contain affiliate links. If you choose to make a purchase after clicking an affiliated link, I may receive a commission at no additional cost to you.

    As always, thank you so much for your support. I couldn't do what I do without you!

    Categories

    All
    Angora Rabbit Care
    Book Corner
    Garden Growing Guide
    Homesteading: The Quest For A Simple Life
    Recipe Corner

    Archives

    February 2025
    January 2025
    August 2024
    April 2024
    February 2023
    August 2022
    June 2022
    May 2022
    March 2022
    January 2022
    June 2021
    May 2021
    April 2021
    February 2021
    January 2021
    December 2020
    November 2020
    October 2020
    September 2020
    August 2020
    May 2020
    April 2020
    March 2020
    February 2020
    January 2020
    December 2019
    November 2019
    October 2019
    September 2019
    July 2019
    June 2019
    April 2019
    March 2019
    February 2019
    January 2019
    November 2018
    September 2018
    August 2018
    July 2018
    March 2018
    January 2018
    December 2017
    October 2017
    September 2017
    May 2017
    April 2017
    March 2017
    February 2017
    November 2016
    October 2016
    June 2016
    May 2016
    April 2016
    March 2016
    February 2016
    January 2016
    May 2015
    March 2015
    December 2014
    November 2014
    August 2014
    March 2014
    February 2014
    December 2013
    November 2013
    August 2013
    April 2013
    February 2013
    January 2013
    December 2012
    October 2012
    April 2012
    October 2011
    September 2011
    June 2011
    January 2011
    June 2010
    May 2010
    April 2010
    March 2010
    December 2009
    November 2009
    November 2008
    March 2008

    RSS Feed

    Do you dream about living the simple life?  Your own idyllic farm where the cows moo and the veggies are the best you've ever eaten? I've got a surprise for you, homesteading isn't easy! Join me at my small eco family farm where we stumble often, and learn as we go. This is indeed the good life, but it is also a very hard life that only rewards for that hard work... or not!  Back to the land, it's tough and I love it.Hi there! My name is Jen. I'm a "tree hugging dirt worshiper" who has been organically farming for nearly two decades. It never ceases to amaze me at how much I've learned & how much I am still learning. I have studied natural health, nutrition, & herbs for nearly three decades. Our health & the natural world around us are connected in ways we don't often realize. How we treat the land & animals directly affects us in both body & mind. My goal is to provide others with truly natural humane goods from my own little piece of paradise, & to freely pass along whatever knowledge I pick up along the way. I am grateful every day to be able to have such a worthwhile & fulfilling job surrounded by the beauty & unpredictability of Mother Nature.

    Picture
    Picture

    Copyright

    You're welcome to link to Running Bug Farm or use a single image with a brief description to link back to any post. Republishing posts in their entirety is prohibited.

Running Bug Farm Disclaimer: Nothing contained in articles &/or content is or should be considered, or used as a substitute for, veterinary or medical advice, diagnosis or treatment.
Running Bug Farm, West Union, WV, USA 26456 | © 2008-2025 All Rights Reserved
RunningBugFarm.com
  • Shop
  • Reviews
  • Blog
  • About
  • Resources & Support
  • Angora Rabbit Colors