RUNNING BUG FARM
  • Shop
  • Reviews
  • Blog
  • About
  • Resources & Support
  • Angora Rabbit Colors

How To Grow Heirloom Nankeen Cotton From Seed

10/27/2020

 
How to grow Nankeen cotton from seed. Heirloom brown cotton growing guide from your friends at Running Bug Farm, Better Than Organic.
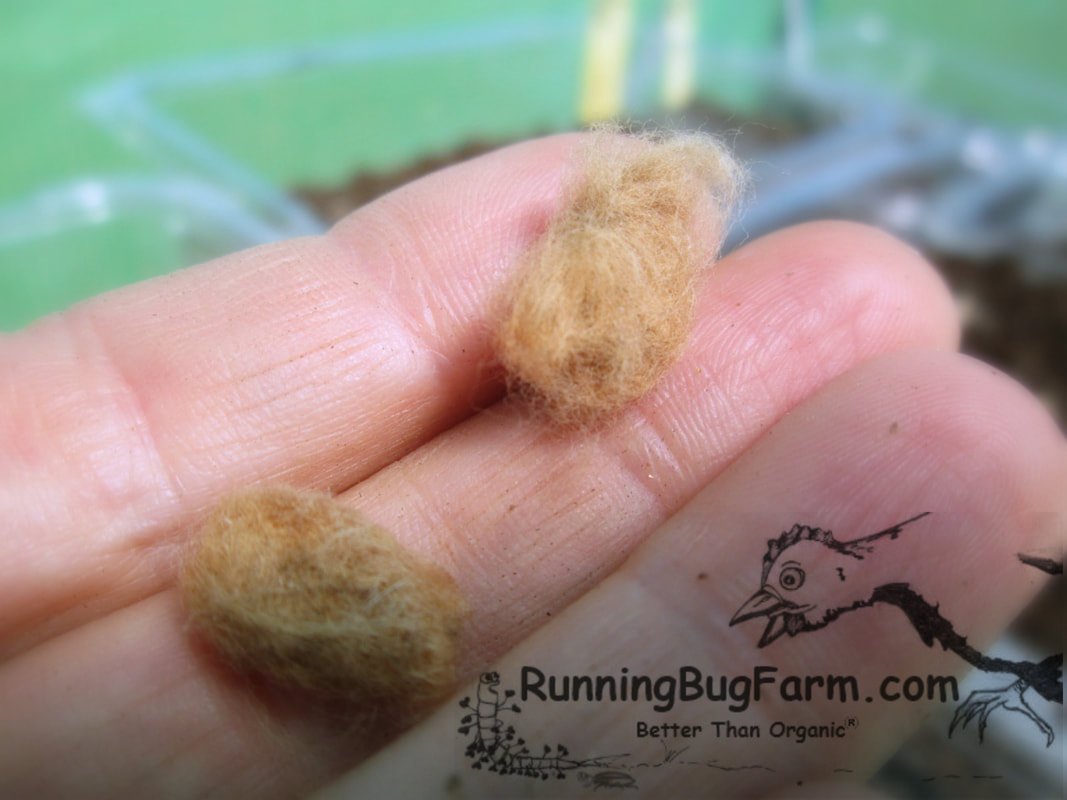
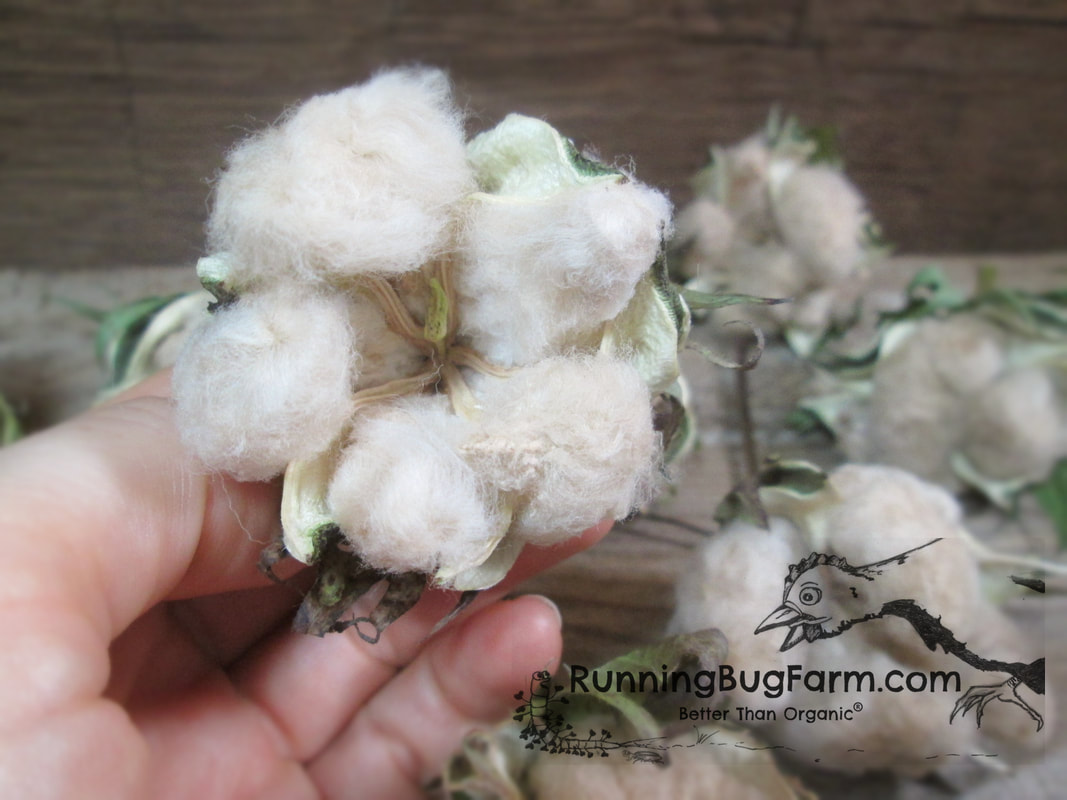
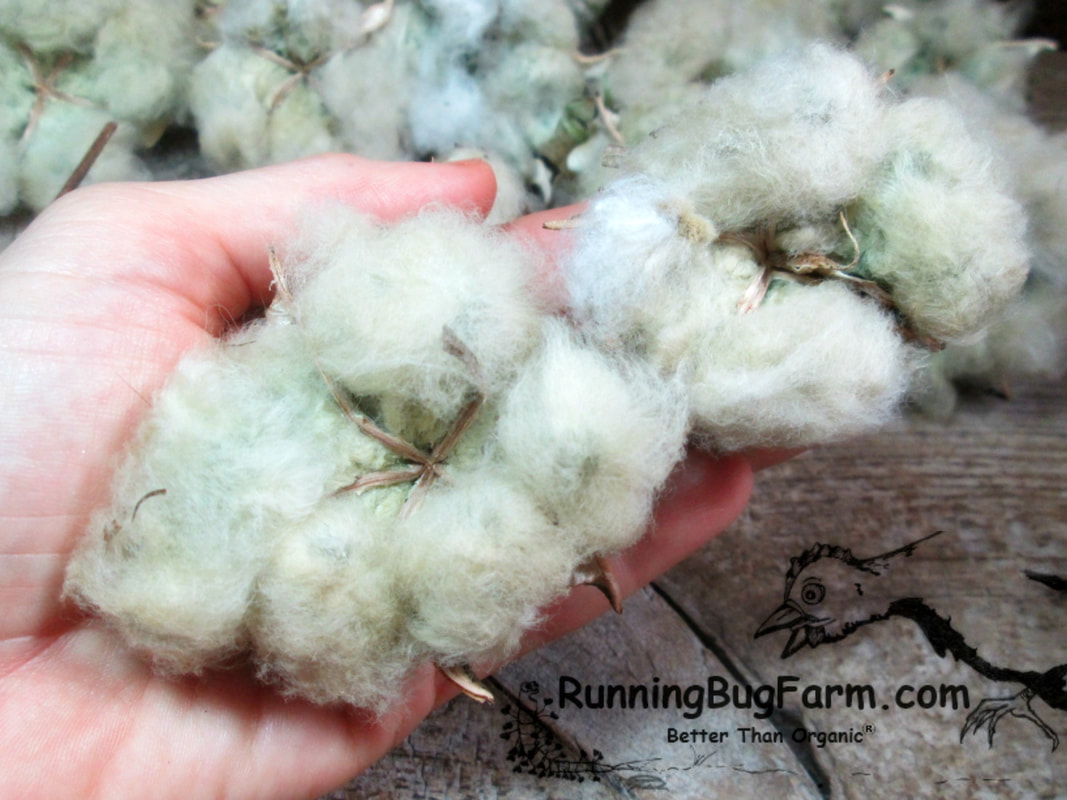
Nankeen cotton seeds.
Rich in American history, Nankeen has been grown since the Civil War.

Nankeen is a naturally brown cotton with short fibers. The lint doesn't fade like some colored cottons. Plants should produce a dark copper colored lint that can become brighter after washing. Nankeen Branches tend to be longer & thinner, with leaves that are more lobed than other cottons.

It is reported to grow well in poor dry soil. In my experience, I don't feel this holds true. I had a early summer drought & while it did survive, growth was stunted until the rains returned. Once rainfall levels returned to normal, the plants finally started to put on thicker folliage, height, & flowers. 

Nankeen is also reported to be hardier & with slightly better insect resistance than other cottons. I noticed no difference regarding aphids on my Nankeen plants verses any of the other heirloom cottons that I have grown. In my experience, they all get aphids & they all survive with them as long as they are not overrun when they are still small. I do not have problems with any other pests in my area (I am not in the cotton belt). To deal with aphids & the ants who milk them when the plants are young, I use diluted neem seed oil. Note that if you put undiluted neem seed oil on your plants, they will likely cook in the sun just like food in a hot pan of oil. The plants may survive such harsh treatment depending on how big & healthy they were before you applied it.

Nankeen likes to drop it's branches as they gain weight with bolls which are high in water. What I mean by drop it's branches is the branches tend to peel off at the trunk. Some hang on by a thread & will survive, others do not. I often prune these branches because it makes maintaining the grass that grows between my rows difficult to maintain if I don't. If you don't need to maintain the space between your rows, you may wish to let them lie. Keep in mind that when folliage touches the ground, it encourages bacteria, so be sure to keep an eye on your plants health.

In order to deal with Nankeen's fragile limbs, I stake my plants with small metal fencing stakes (3-5' usually work well) rather than traditional garden stakes. I can get pretty high winds in my area. The fence stakes keep the plants from being being badly damaged during severe summer weather.

After dealing with an early summer drought, I later had a early frost. The drought dramatically slowed the growth of my Nankeen plants and the early frost caused further problems as it was too early to harvest. The plants needed several more weeks of growth that the frost was trying to prevent. I did manage to harvest the bolls, but yields were very low & I personally am not a fan of the very short fibers that have resulted. I often say, each year after growing a particular cotton that I am unlikely to grow it again. I sometimes think it's just due to farm girl exhaustion. By this time of year, the days are getting much shorter, temps are dropping & I'm still bringing in the harvest after six months of straight back breaking labor.

With all that said, I don't think I will grow this cotton again. Sea Island Brown has been one of my favorite brown cottons to grow. For green, I am partial to Arkansas. If you are curious about growing Nankeen don't let my lackluster harvest results sway you. We all have different micro climates. You may find that Nankeen is one of your favorites!
Seed starting guide: Heirloom Nankeen Cotton a natural non GMO brown cotton grown since the Civil War.
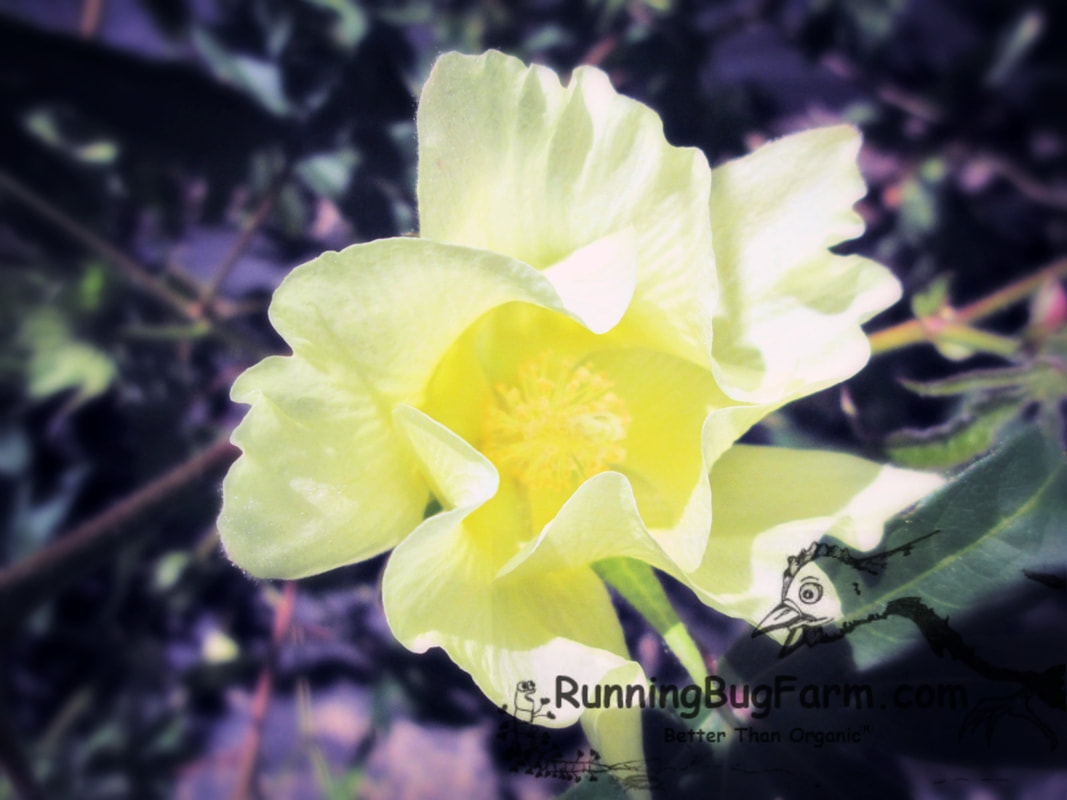
Nankeen cotton flower.
During the Civil War Battle of Sabine Crossroads (Mansfield, LA), Confederates told the story of the Nankeen shirt. The story was first printed in the ‘Mansfield Enterprise’ & later in the monthly 'Confederate Veteran,' VOL XXXIII – May 1925

"The plan of General Banks was to assemble his army
at Grand Ecore and either cross to the north side of the river to join General Steele & march their united armies against Shreveport, or to march through the forest via Mansfield which was much the nearer. It was important that General Dick Taylor should know which route the Federals would take, hence the story of the 'Nankeen Shirt.' According to the story, an officer on General Taylor's staff visited Natchitoches & Grand Ecore just before the arrival of the Federal army & laid a number of plans to get this information at the earliest moment. He finally approached an old doctor, who too old for service was practicing his profession in that vicinity. The doctor was more than anxious to do all he could to help the cause & thought it would probably be easy to see what route the Yankees took when they marched away from Grand Ecore, but it would be a different matter to get a message to General Taylor's headquarters at Mansfield. However, he mentioned that there was a fifteen-year-old boy at his home going to school whose father was in the army. Before he left for the war he had moved his slaves from the lower part of the State to a place in Sabine Parish only sixteen miles from Mansfield. The Negroes were being looked after by a Captain John P. Youngblood, a maimed Confederate soldier who was a true patriot. The doctor was unwilling for the boy to play the part of a spy, but suggested that when the Yankee army marched from Grand Ecore he would send the boy with a verbal message to Captain Youngblood to move the Negroes into Texas. He took the officer into the boy's room & laying a number of nankeen shirts on the table said: "There are the boy's shirts. You will see that some are decorated with braid down the front while others are plain -- that is without braid. Now when I send the boy with the message to Captain Youngblood, I will see that he wears a shirt with braid on it if the Yankees are crossing to the north side of Red River, but if they are marching over the road to Mansfield he will wear a shirt without braid, so by a glance at his shirt front you can tell which way the Yankee army is moving.” A thorough understanding was had between the doctor & the staff officer & the latter went to Captain Youngblood & arranged that as soon as the boy arrived, Captain Youngblood was to put him in a buggy & whisk him to General Taylor's headquarters at Mansfield. The plan worked to perfection: the officer looked the boy over & questioned him a little, but he knew nothing more than that he had been sent by the doctor to tell Captain Youngblood to move the Negroes to Texas. However, General Taylor knew definitely of his opponent's movements & prepared to fight him before he got out of the woods while his army was so scattered that his superior numbers gave him no advantage. The result is written in three consecutive defeats of the Federal army at Mansfield, Chapman's Peach Orchard, & Pleasant Hill."

Information provided by Southern Exposure Seed Exchange
How to grow heirloom Nankeen brown cotton from seed outdoors without chemicals.
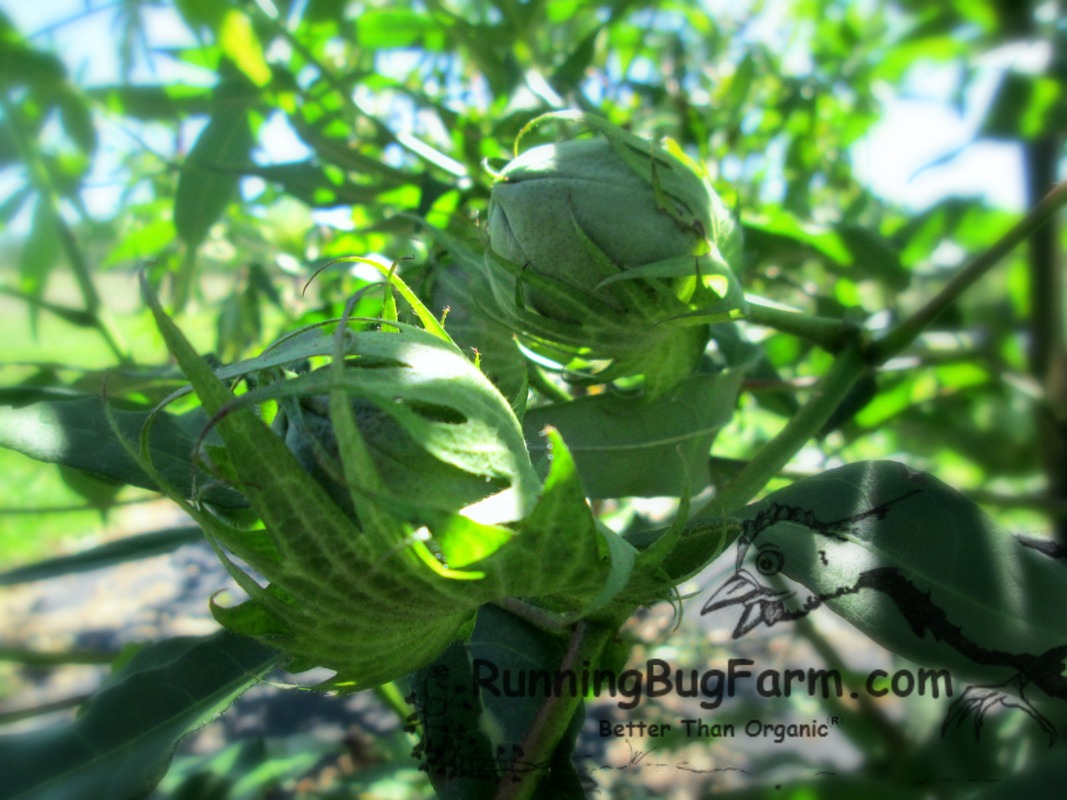
Unopened bolls.
Growing Guide

Cotton is an annual plant that requires a long, warm growing season to mature properly. It needs full sun. In zones 8–10 it can be sown directly after the last frost. In zones 5–7, treat like tomatoes, start seed indoors & transplant out 4–8 week-old seedlings after last frost. Seed germinates in 7–21 days at 70°F. Plant 20–32" inches apart in rows 6' feet apart. Plants start flowering in mid-summer. Bolls take a few more months to mature; warm late summer weather is necessary for a good crop. Plants grow to 4-5' feet tall.

130 - 180 day Annual

Direct Sowing: Sow seed in a light, well drained, slightly acid to neutral soil. Supply soil generously with compost or other organic matter, especially in clay. Sow no deeper than 2 - 4 times the seed diameter. Do not sow in waterlogged soil or heavy clay. Harvest in 180 days.

Transplanting: Use a good quality sterile seed starting mix. Sow pots or flats 4 - 8 weeks before transplanting. When several leaves have developed, harden off the seedlings by placing them outdoors in direct sunlight for no more than an hour. Gradually increase the outdoor exposure over a period of several days. Transplant to the garden after the last frost. Harvest in 130 days from transplant.

Harvest: Wait for bolls to split open before harvesting.

Seed Savers: Isolate varieties by 1/8 mile for home use, or 1/4 to 1/2 mile or greater for pure seed.

Weeds & Water: Weed barrier fabric helps to both suppress weeds & keep more moisture in the soil where the plants need it. I have tried a wide range of weed barrier fabrics from free to more expensive & have found the 12 year fabric by Dewitt performs the best.
Starting Nankeen Cotton plants from seed without chemicals.
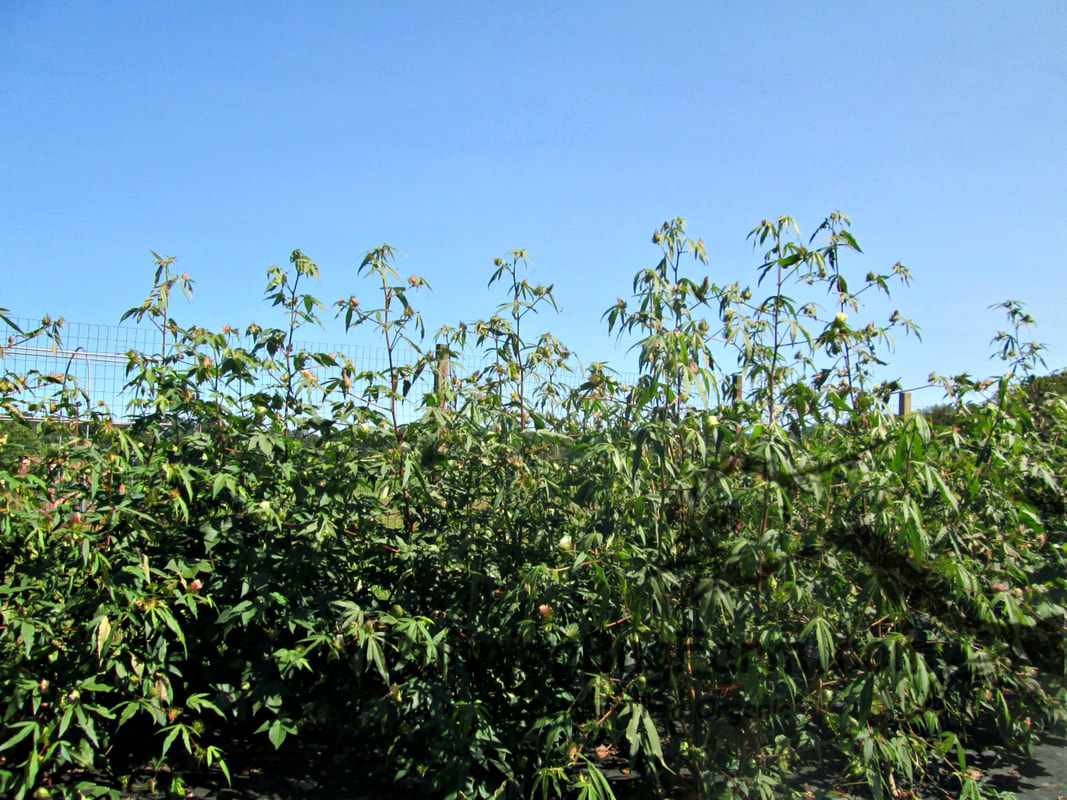
Very small crop of Nankeen plants at the end of summer.
"Conventional cotton is considered the world's 'dirtiest' crop due to its heavy use of insecticides, the most hazardous pesticide to human and animal health. Conventional cotton covers 2.5% of the world's cultivated land yet uses 16% of the world's insecticides, more than any other single major crop.

Aldicarb, parathion, and methamidopho, three of the most acutely hazardous insecticides to human health as determined by the World Health Organization, rank in the top ten most commonly used in cotton production.
All but one of the remaining seven most commonly used are classified as moderately to highly hazardous.

Aldicarb, conventional cotton's second best selling insecticide and most acutely poisonous to humans, can kill a man with just one drop absorbed through the skin, yet it is still used in 25 countries and the US, where 16 states have reported it in their groundwater."  - Organic Trade Association
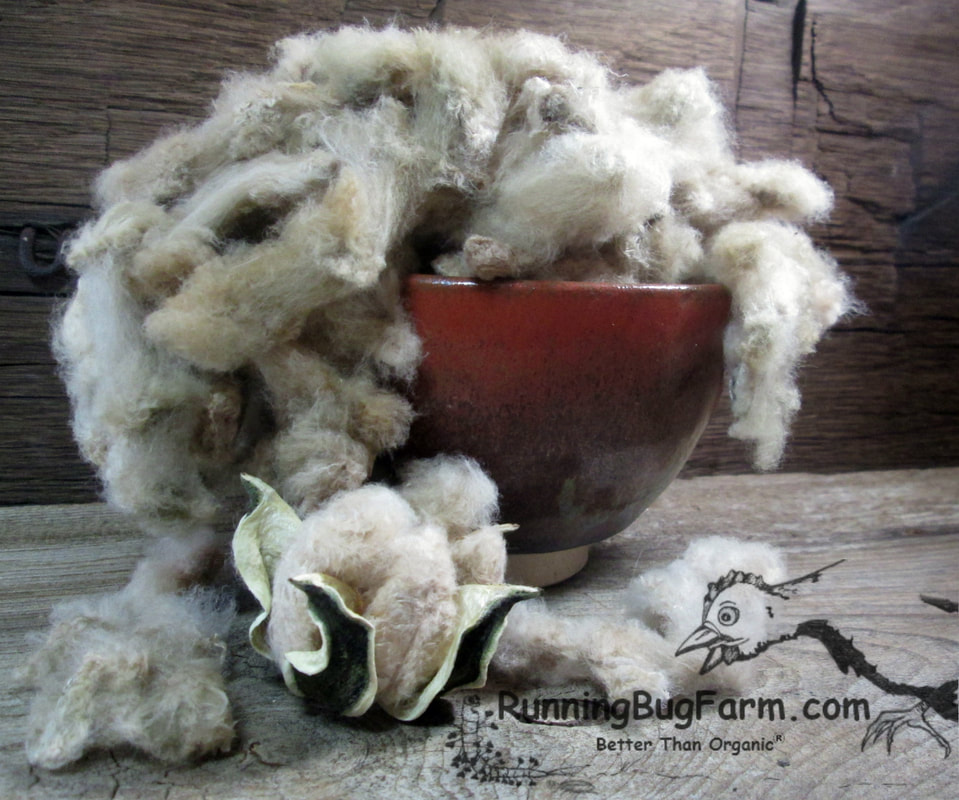
Grow your own heirloom Nankeen Cotton without chemicals.
Lint with seeds intact and a boll.

How To Grow Heirloom Musquee de Provence Pumpkins

10/21/2020

 
Picture
My harvest the first week of October.
While my focus is the Musquee de Provence (Cucurbita moschata) pumpkin, my growing guide can be applied to any pumpkin.

Slightly flattened deeply lobed pumpkin shaped like large wheels of cheese. Some folks refer to them as cheese wheel pumpkins or fairy tail pumpkins. They start out green and over time ripen to a rich orange brown. The edible flesh is deep orange in color, thick, and very flavorful. Pies made with the Musquee de Provence are a beautiful orange color. It is also well suited for soups, breads, and more. I even add some to my pumpkin goat milk soap and to my cats food.

Musquee d Provence originates in Southern France during the late 1800's. When fully ripe, they typically weigh about 20lbs each.


Growing Guide

Botanical Name: Cucurbita moschata

Start indoors: 3-4 weeks before the last frost
Sow outside (direct sow): 2-3 weeks after the last frost
Soil Temperature For Germination: 70-95°F
Size: 10-20' sprawl
Zone: 3-10
Sun: Full
Water: Moist, Well Drained, Fertile
Soil pH: 6-6.8
Seed Planting Depth: 1"
Seed Spacing: 6-12"
Days to Germination: 7-14
Thinning: 2-3' in rows 4-6' apart
Days to Harvest: 100-110

Pumpkins are very thirsty plants. They need about 1" of water per day. I have successfully grown pumpkins during a severe drought. I had to hand water each plant thoroughly every single day. I focus on the main hub of the plant. During a drought, there are a lot less fruits. Drip irrigation is great if you can afford it. Pumpkin foliage can get diseases when wet. The fruits can rot if too wet as well.

If the soil your maturing fruits are resting on seem excessively wet due to poor draining soil (pumpkins prefer moist, well drained soil), you can try to prop up the fruits to get them off of the wet ground. Sometimes cardboard will work. Although this will also give squash bugs a great place to hide. Squash Cradles can be purchased that gently keep the fruits off the soil. While these can be a bit of an investment up front, squash cradles can be re-used over many growing seasons.

Aside from being heavy drinkers, pumpkins are also heavy feeders. You want a compost rich, moist, well draining soil for optimal results. If you can grow your pumpkins on a gentle incline, this will greatly help to keep water from pooling. The more optimal your growing environment is for your pumpkin plants, the less extras you will need, making growing easier and more affordable.


Insect Control:
Floating row cover, barrier netting, or remove by hand as needed.
I find that floating row cover is much more durable and lasts longer. The downside is that it's not easy to see through and harder to water through although it is permeable. Barrier netting is easy peasy to see through and water through. The downside is that it is easy to damage and not as long lasting.

Note: Row cover and barrier netting can only be used on young plants. You will need to remove when the plants flower so that they can be pollinated by insects.

If necessary, protect leaves and flowers from deer and protect the fruits from wildlife. With my rural environment, protection is a must. As a result I've been using deer fencing for nearly two decades. I haven't found anything that works better to keep all my crops safe, including my pumpkins.

Seed Savers:
Pumpkins easily cross pollinate with other squash. To ensure true seeds, either plant only one type of squash per growing season. Or cover each blossom so that insects cannot access the flowers and hand pollinate the blossoms yourself, then re-cover until fruits begin to form.

Harvest:
When mature, not earlier. The color will typically turn a deep orange-brown with threads of green. The stems and rinds harden. The rind will sound hollow when you gently knock on it. If a fingernail pressed into the skin resists puncture, it is ripe.
Carefully cut the fruit off of the vine, do not twist or tear. Leave 3-4" of stem to increase storage life.

Cure:
Place in a critter safe, sunny spot for about a week with temperatures and humidity both around 80-85°F.

Store:
Ideally in a cool dry root cellar if possible. If this is not possible, choose an area that is as close as possible to this environment. 50-55°F for about 2 to 3 months.
I successfully store mine in a cool dark corner of my cabin on the lower floor. I stack them about 3-4 fruits high.

Enjoy:
Like other hard-skinned winter squash, pumpkins can be stored whole, roasted, made into purées, and frozen. You can also roast and eat the seeds.

Note of Caution: Home canning is not considered safe for pumpkins. I roast, purée, drain with a yogurt cheese maker (pumpkins have a lot of water), put into quart sized glass mason canning jars, remove as many air pockets as I can, cover with a bit of waxed paper (to reduce freezer burn), put on a lid, then freeze*.
*Don't forget to leave space in your freezer jar for expansion. I usually leave at least 2" so the jar doesn't crack.

I like to use quart size jars for freezing. They are easier for recipe sizes and thawing. For making pumpkin pie, I will take out two quart jars, drain a second time, then use the amount I need for baking. If I have any left over, I re-freeze in a smaller canning jar (either a pint or jelly depending on what I have left).
Picture

How To Grow Inchillium Red Softneck Garlic From Seed

10/19/2020

 
Freshly harvested Inchillium Red soft neck garlic. Plant in the fall for a summer harvest. Great for farmers markets and easy organic heirloom garlic to grow.
Freshly harvested Inchillium Red soft neck garlic. Largest bulbs are in the cart to dry, smaller bulbs are for immediate use both fresh & to dry for garlic powder.
Growing Inchillium Red soft neck garlic is surprisingly easy and relatively low maintenance. It also stores longer than hard neck types of garlic. If you choose to use weed barrier cloth, it is even easier. Generally, garlic is planted in the fall for a early summer harvest. My little West Virginia Eco Farm is located in Zone 6b. You can zero in on your USDA Plant Hardiness Zone here. I plant my crop in October and try to harvest it by the end of June or no later than the first week of July. Weather permitting. The only problems I tend to have are that it almost always rains a lot around the time I need to harvest. The bulbs do not require much watering the closer it gets to harvest time. It is actually better if conditions are on the dry side. Too much rain or over watering can cause the bulbs to rot.

Choosing your garlic seed to plant is very important. If you ordered from a seed supplier, depending on the amount you ordered, you may choose to plant every single clove to get you started. If you have more than enough cloves like I do, it pays to be a bit more choosy. Select only the biggest and healthiest cloves that you have. While it's not a guarantee, it will greatly increase your odds of getting larger sized bulbs out of your harvest. Save the smaller cloves for eating if you can.

By October I have mapped out where I will be planting the years garlic. I like to try to keep from planting my garlic in the same spot for at least 5 years for good crop rotation. Sometimes it's shorter, but never shorter than 3 years. Summary: Crop rotation is 3-5 years for good pest and disease control.

I prepare the beds by ensuring at least one has a new application of compost. I tend to choose a second bed that didn't have compost added to it that season but still has relatively loose and fertile soil. My reasoning is that if there are any imbalances in either soil type, I have given myself a little protection in not potentially loosing my entire crop. I also try to plant each row in different locations rather than side by side for the same reason. Regarding crop success, I haven't had any major differences in either bed type in the decade plus I've been exclusively growing Inchillium Red soft neck garlic. However, I do sometimes notice a difference in the density of the leaves. I always have variety in the bulb sizes. This happens in both rows. Another occasional difference is bug damage. One section of a row may be rather hard hit with bug damage, while the other row will be free and clear. I always plant more garlic than I need to cover any losses. I do not use chemicals or any other treatments to deal with pests.

On the subject of pests, I give my wonderful neighboring farm some of my garlic abundance. They store these bulbs in Diatomaceous Earth aka DE. This quickly resolves any Dry Bulb Mites (Eriophyes Tulipaie or Aceria Tulipae Keifer) and Onion Maggots (Delia Antiqua)
that may have gotten into the garlic heads. This method also vastly increases storage life. Not only that, it also reduces the likelihood of planting infested bulbs in the fall; effectively cutting off the pests lifecycle.

When my beds are ready for planting, I pull out my Dewitt weed barrier cloth that I have dedicated to growing garlic. I have used a lot of different brands and types of weed barrier cloth. All they created for me was a headache and a financial loss. These cheaper brands have been nothing but a time suck and cash drain. Some of them only lasted two weeks before starting to deteriorate. This caused a heck of a miserable time trying to clean up the degrading bits. Dewitt has become ridiculously expensive for the past four plus years. I used to get it for less than half what I'm seeing it sell for now. It is my hope that the prices will stabilize in the near future. Thankfully, if properly cared for, it has a 12 year life. While mine have yet to reach that age, some rolls are a little over half that age. I have no complaints.

A head of garlic contains the garlic seed. The seed are the individual cloves within the head. You want to gently break apart the head until you have nothing but loose individual cloves. Do not remove the papery husk from the cloves - they protect the cloves from rotting.

I cut X's into the cloth for where each clove will be planted. Thankfully, once I've cut my X, I'm good to go until the cloth gives up the ghost (hopefully 12 years down the row). You can use a garden dibbler or a hori hori garden knife to make a 2" deep hole for each clove. You want to place the clove in the ground so that the pointy end faces up. The wider part of the clove should always be at the bottom. If you used a garden dibbler to make the hole, gently push the soil over the hole to cover the clove. If using a hori hori garden knife, carefully remove the blade with a slightly rocking motion. The soil usually falls onto the clove. Once the blade is fully removed, if more soil is needed to cover the clove, gently brush it into place. When I first started, I used a wooden garden dibbler handcrafted from a shop on etsy. The wood started to crack, so I decided to try out a hori hori garden knife. Now it's all I use. The biggest downside to a hori hori in my opinion is also one of it's biggest pluses, it's sharp. I like to leave the blade in the soil and rock the blade to widen the hole. With my other hand, I use my fingers to push the clove into the soil. If I'm tired or feeling rushed, I have cut my gloves in the process. My recommendation is if you have very young garden helpers, let them use a wooden garden dibbler and save the hori hori garden knife for more mature users.

For the most part, you shouldn't have a lot of weeding to do until late winter, early spring. If you stay on top of it, the work will be minimal in this regard. Generally weeds need to be removed along the edges of the weed barrier cloth & from the holes in the cloth that the garlic is growing through. If you choose not to use weed barrier cloth, a weed hoe aka stirrup hoe or hula ho can greatly cut down on hand weeding. You can also opt to space your garlic so that a weed hoe will fit between them from all sides. No matter what, there will be weeds that grow tight to the bulbs. In this situation, hand weeding is required.

Harvest when 1/3 of the lower leaves start to turn brown and dye off. For me this is usually by the end of June. Soft neck garlic doesn't produce scapes. You can not use scapes as a reference as to when to harvest.

Using Dewit brand weed barrier cloth to grow Inchillium Red soft neck garlic. Nearly weed free eco farming.
Growing with weed barrier cloth. Planted in the beginning of October. Picture taken mid November.
Growing Inchillium Red soft neck garlic in rows. Soil bare. This requires regular weeding. A weed hoe is helpful.
Growing without weed barrier cloth. Planted in the beginning of October. Picture taken the end of April. A weed hoe is a must in this situation.
Growing Guide

Garlic is an annual plant in the Amaryllidaceae family that first requires a brief growing season, then cold to go dormant. It will then rush back to life in the spring, showing rapid growth.

7-9 Months

Zone: 5-9
Sun: Full
Water: Moist, Well Drained
Soil: Slightly Acidic to Neutral (6.0-7.0)
Clove Spacing: 6"

Row Spacing: 6" to 12" inches
Height: 12-18" tall
Scientific Name:
Allium sativum

Direct Sowing: Plant 6 to 8 weeks before the ground freezes or around your first fall frost date. Sow seed in a light, well drained, slightly acid to neutral soil. Supply soil generously with compost or other organic matter, especially in clay. Sow 2" inches deep with the wider root facing down, slender pointed side faces up. Row space: 6" to 12" inches. A 10' foot row should produce around 5lbs of bulbs. Do not sow in waterlogged soil or heavy clay. Harvest in 7-9 months.

Transplanting: Not recommend.

Harvest: Very early summer. Do not pull from the stems. First, use a garden fork or a shovel to loosen soil around the bulbs. Then gently remove the bulbs from the soil. Be sure to try not to pierce or cut the bulbs.

Curing: Curing is critical. It improves the flavor and hardiness of the bulbs. Do not cut the stems from the bulbs. Leave the green tops intact. Gently move to a shaded, warm, dry, and well-ventilated area. Hang in bundles or spread the bulbs out in a single layer on wire screens or drying racks. If possible, use fans to circulate the air (do not point the fan/s directly at the bulbs). Allow to cure until the neck is dry and outer skin is papery, approximately 2 - 3 weeks. During this time, check for spoiled bulbs being careful to handle them gently and as little as possible. The high water content of the bulbs after harvest means that they can be easily bruised. They are also much more susceptible to rot. Once curing is complete you can cut off the dried tops approx. 1" inch above the bulb. Or leave in place to braid. They are now ready for eating, storage, or planting.

Storage: Store out of direct light no more than 4" inches deep in sturdy brown paper bags or boxes in order to maintain good air circulation. Store by braiding or tying several heads together and hanging up, or store by cutting tops off and placing bulbs in a mesh bag or open container, or spread on shelves in a layer less than 4" inches deep. Keep in a cool, dry, well-ventilated place at 45-55°F (7-13°C) and 50-60% relative humidity. Garlic stored in the refrigerator is likely to sprout. You can typically use an unheated room in your house, a root cellar, your garage, etc. Inspect at least once a month. Remove bulbs which have sprouted or spoiled. Otherwise they may all end up spoiling.

Seed Savers: Softneck varieties average 7 large cloves per head and 45 cloves per pound. Keep in mind that these numbers are averages. The actual number of cloves per pound can vary from year to year depending upon the weather and the growing conditions during seed production.

Weeds & Water: Weed barrier fabric helps to both suppress weeds and keep more moisture in the soil where the plants need it. I have tried a wide range of weed barrier fabrics from free to more expensive & have found this 12 year fabric by Dewitt performs the best. If not using weed barrier fabric, a weed hoe and hand weeding is recommend. Garlic is a hungry plant that doesn't do well when competing with weeds for nutrients.
Inchillium Red soft neck garlic garden and market natural chemical free growing guide from Running Bug Farm USA.
Freshly harvested Inchillium Red soft neck garlic ready for the farmers market. Plant in the fall for a summer harvest.

    Affiliate Disclosure

    This page may contain affiliate links. If you choose to make a purchase after clicking an affiliated link, I may receive a commission at no additional cost to you.

    As always, thank you so much for your support. I couldn't do what I do without you!

    Categories

    All
    Angora Rabbit Care
    Book Corner
    Garden Growing Guide
    Homesteading: The Quest For A Simple Life
    Recipe Corner

    Archives

    February 2025
    January 2025
    August 2024
    April 2024
    February 2023
    August 2022
    June 2022
    May 2022
    March 2022
    January 2022
    June 2021
    May 2021
    April 2021
    February 2021
    January 2021
    December 2020
    November 2020
    October 2020
    September 2020
    August 2020
    May 2020
    April 2020
    March 2020
    February 2020
    January 2020
    December 2019
    November 2019
    October 2019
    September 2019
    July 2019
    June 2019
    April 2019
    March 2019
    February 2019
    January 2019
    November 2018
    September 2018
    August 2018
    July 2018
    March 2018
    January 2018
    December 2017
    October 2017
    September 2017
    May 2017
    April 2017
    March 2017
    February 2017
    November 2016
    October 2016
    June 2016
    May 2016
    April 2016
    March 2016
    February 2016
    January 2016
    May 2015
    March 2015
    December 2014
    November 2014
    August 2014
    March 2014
    February 2014
    December 2013
    November 2013
    August 2013
    April 2013
    February 2013
    January 2013
    December 2012
    October 2012
    April 2012
    October 2011
    September 2011
    June 2011
    January 2011
    June 2010
    May 2010
    April 2010
    March 2010
    December 2009
    November 2009
    November 2008
    March 2008

    RSS Feed

    Do you dream about living the simple life?  Your own idyllic farm where the cows moo and the veggies are the best you've ever eaten? I've got a surprise for you, homesteading isn't easy! Join me at my small eco family farm where we stumble often, and learn as we go. This is indeed the good life, but it is also a very hard life that only rewards for that hard work... or not!  Back to the land, it's tough and I love it.Hi there! My name is Jen. I'm a "tree hugging dirt worshiper" who has been organically farming for nearly two decades. It never ceases to amaze me at how much I've learned & how much I am still learning. I have studied natural health, nutrition, & herbs for nearly three decades. Our health & the natural world around us are connected in ways we don't often realize. How we treat the land & animals directly affects us in both body & mind. My goal is to provide others with truly natural humane goods from my own little piece of paradise, & to freely pass along whatever knowledge I pick up along the way. I am grateful every day to be able to have such a worthwhile & fulfilling job surrounded by the beauty & unpredictability of Mother Nature.

    Picture
    Picture

    Copyright

    You're welcome to link to Running Bug Farm or use a single image with a brief description to link back to any post. Republishing posts in their entirety is prohibited.

Running Bug Farm Disclaimer: Nothing contained in articles &/or content is or should be considered, or used as a substitute for, veterinary or medical advice, diagnosis or treatment.
Running Bug Farm, West Union, WV, USA 26456 | © 2008-2025 All Rights Reserved
RunningBugFarm.com
  • Shop
  • Reviews
  • Blog
  • About
  • Resources & Support
  • Angora Rabbit Colors